Lexus ES: Intake System
On-vehicle Inspection
ON-VEHICLE INSPECTION
CAUTION / NOTICE / HINT
The necessary procedures (adjustment, calibration, initialization or registration) that must be performed after parts are removed and installed, or replaced when repairing air leaks in the intake system are shown below.
Necessary Procedures After Parts Removed/Installed/Replaced| Replaced Part or Performed Procedure | Necessary Procedure | Effect/Inoperative Function when Necessary Procedure not Performed | Link |
|---|---|---|---|
| Air leak from intake system is repaired | Inspection After Repair |
| |
PROCEDURE
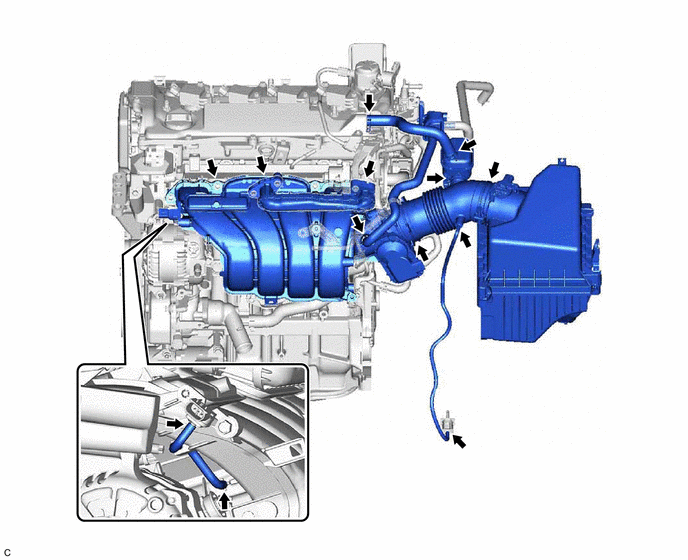
1. INSPECT INTAKE SYSTEM
CAUTION:
To prevent injury due to contact with an operating V-ribbed belt or cooling fan, keep your hands and clothing away from the V-ribbed belt and cooling fans when working in the engine compartment with the engine running or the engine switch on (IG).
.png)
HINT:
Perform "Inspection After Repair" after repairing vacuum leaks in the intake system.
Click here .gif)
(a) Check that there are no vacuum leaks at the points shown in the illustration.
2. PERFORM INITIALIZATION
(a) Perform "Inspection After Repair" after repairing vacuum leaks in the intake system.
Click here
READ NEXT:
 Lubrication System
On-vehicle InspectionON-VEHICLE INSPECTION PROCEDURE 1. CHECK ENGINE OIL LEVEL (a) Warm up and stop the engine, then wait for 5 minutes. (b) Check that the engine oil level is between the low level a
Oil And Oil Filter
ComponentsCOMPONENTS ILLUSTRATION *1 CENTER NO. 4 ENGINE UNDER COVER - - ILLUSTRATION *1 OIL FILTER SUB-ASSEMBLY *2 OIL FILLER CAP SUB-ASSEMBLY *3 GASKET *4 OIL PAN D
SEE MORE:
Customize Parameters
CUSTOMIZE PARAMETERS CUSTOMIZE POWER MIRROR CONTROL SYSTEM (w/ Memory) NOTICE:
When the customer requests a change in a function, first make sure that the function can be customized.
Record the current settings before customizing.
HINT: The following items can be customized. (a) Customizing
Generator Control Module(EEPROM Learning Value) Calibration / Parameter Memory Failure (P062F46)
DESCRIPTION The inverter with converter assembly monitors its internal operation and will store this DTC if it detects a malfunction of its EEPROM. DTC No. Detection Item DTC Detection Condition Trouble Area MIL Warning Indicate P062F46 Generator Control Module(EEPROM Learning Val
