Lexus ES: Installation
Lexus ES (XZ10) Service Manual / Vehicle Exterior / Door / Hatch / Fuel Lid Opener Switch / Installation
INSTALLATION
PROCEDURE
1. INSTALL FUEL LID OPENER SWITCH (TRUNK AND FUEL SWITCH ASSEMBLY)
(a) Engage the 2 claws to install the fuel lid opener switch (trunk and fuel switch assembly) as shown in the illustration.
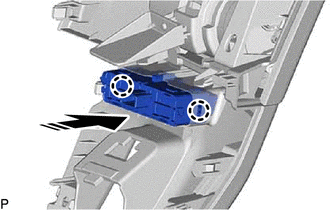
.png) | Install in this Direction |
2. INSTALL LOWER INSTRUMENT PANEL FINISH PANEL SUB-ASSEMBLY
Click here .gif)
3. INSTALL NO. 1 INSTRUMENT PANEL UNDER COVER SUB-ASSEMBLY
Click here
4. INSTALL INSTRUMENT SIDE PANEL LH
Click here
5. INSTALL FRONT DOOR OPENING TRIM COVER LH
Click here
6. INSTALL COWL SIDE TRIM BOARD LH
Click here
7. INSTALL FRONT DOOR SCUFF PLATE LH
Click here
READ NEXT:
 Precaution
PRECAUTION PRECAUTION FOR DISCONNECTING CABLE FROM NEGATIVE AUXILIARY BATTERY TERMINAL NOTICE: When disconnecting the cable from the negative (-) auxiliary battery terminal, initialize the following s
Parts Location
PARTS LOCATION ILLUSTRATION *1 FUEL LID LOCK WITH MOTOR ASSEMBLY *2 FUEL LID OPENER SWITCH *3 INSTRUMENT PANEL JUNCTION BLOCK ASSEMBLY - FUEL OPN RELAY *4 NO. 1 ENGINE ROOM RELAY B
SEE MORE:
Low or High Power Supply Voltage (C1241)
DESCRIPTION If a malfunction in the power source circuit occurs, or a malfunction in communication with the skid control ECU (brake actuator assembly) or in a speed sensor occurs, the 4WD ECU assembly will prohibit operations by the fail-safe function. DTC No. Detection Item DTC Detection Con
Headlight Dimmer Switch Circuit
DESCRIPTION The steering sensor receives the following switch information:
Light control switch in DRL OFF*1, off*2, tail, head or AUTO position
Dimmer switch in high, low or high flash (pass) position
*1: w/ DRL OFF Switch
*2: w/o DRL OFF Switch
WIRING DIAGRAM CAUTION / NOTICE / HI
© 2016-2026 Copyright www.lexguide.net
