Lexus ES: Installation
Lexus ES (XZ10) Service Manual / Engine & Hybrid System / Cruise Control / Millimeter Wave Radar Sensor / Installation
INSTALLATION
PROCEDURE
1. INSTALL MILLIMETER WAVE RADAR SENSOR ASSEMBLY
NOTICE:
If the millimeter wave radar sensor assembly has been struck or dropped, replace the millimeter wave radar sensor assembly with a new one.
(a) Engage the 2 guides.
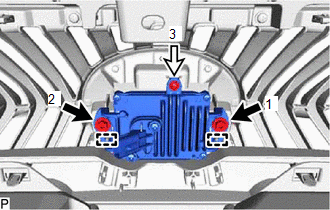
.png) | Bolt |
.png) | Screw |
(b) Tighten the 2 bolts and screw on the millimeter wave radar sensor assembly.
Torque:
Bolt :
2.5 N·m {25 kgf·cm, 22 in·lbf}
HINT:
Tighten the bolts and screw in the order shown in the illustration.
(c) Connect the connector.
2. INSTALL COOL AIR INTAKE DUCT SEAL
Click here .gif)
3. ADJUST MILLIMETER WAVE RADAR SENSOR
(a) When the millimeter wave radar sensor assembly is replaced with a new one, adjustment of the radar sensor beam axis must be performed.
Click here
READ NEXT:
 Parts Location
PARTS LOCATION ILLUSTRATION *1 FORWARD RECOGNITION CAMERA *2 MILLIMETER WAVE RADAR SENSOR ASSEMBLY *3 BRAKE ACTUATOR ASSEMBLY - SKID CONTROL ECU *4 ECM ILLUSTRATION *1 AIR
Precaution
PRECAUTION PRECAUTION FOR DISCONNECTING CABLE FROM NEGATIVE BATTERY TERMINAL NOTICE: When disconnecting the cable from the negative (-) battery terminal, initialize the following systems after the cab
SEE MORE:
Inspection
INSPECTION PROCEDURE 1. INSPECT FUEL PUMP ASSEMBLY (a) Measure the resistance according to the value(s) in the table below. Standard Resistance: Tester Connection Condition Specified Condition 1 - 2 20°C (68°F) 0.45 to 0.55 Ω If the result is not as specified, replace the fu
Vehicle Control History
VEHICLE CONTROL HISTORY NOTICE: Make sure to record any output Vehicle Control History codes before clearing them and checking the Vehicle Control History again. CHECK VEHICLE CONTROL HISTORY (LANE CONTROL SYSTEM) (a) Connect the Techstream to the DLC3. (b) Turn the power switch on (IG). (c) Turn th
© 2016-2026 Copyright www.lexguide.net
