Lexus ES: Inspection
INSPECTION
PROCEDURE
1. INSPECT TIRES
(a) Inspect the tires for wear and proper inflation pressure.
Cold Tire Inflation Pressure:
| Tire Size | Cold Tire Inflation Pressure | |
|---|---|---|
| Front | Rear | |
| 215/55R17 94V | 250 kPa (2.5 kgf/cm2, 36 psi) | |
| 235/45R18 94V 235/40R19 92V | 240 kPa (2.4 kgf/cm2, 35 psi) | |
Cold Tire Inflation Pressure (for Compact Spare Tire):
| Tire Size | Cold Tire Inflation Pressure |
|---|---|
| T155/70D17 110M | 420 kPa (4.2 kgf/cm2, 60 psi) |
(1) Perform initialization.
for HV Model: Click here .gif)
for Gasoline Model: Click here
(2) Tire pressure adjustment method when warm:
- Turn the engine switch (for Gasoline Model) or power switch (for HV Model) off.
- Connect the Techstream to the DLC3.
- Turn the engine switch (for Gasoline Model) or power switch (for HV Model) on (IG).
- Turn the Techstream on.
- Enter the following menus: Chassis / Tire Pressure Monitor / Data List.
- Adjust the tire pressure so that the displayed value is equal to the set pressure.
-
Perform initialization and check that initialization completes.
for HV Model: Click here
for Gasoline Model: Click here
- Check and record the value of the Data List item "Temperature in Tire". (Ts)
- Check and record the ambient temperature during tire pressure adjustment. (Tm)
-
Readjust the tire pressure according to the difference between the tire internal temperature (Ts) and the ambient temperature (Tm). (P)
HINT:
Tire internal temperature: Ts, Ambient temperature: Tm, Tire pressure readjustment value: P
P = (Specified Pressure) + (Ts - Tm)
- Check the pressure adjustment value with the Data List item "Tire Inflation Pressure".
| (b) Using a dial indicator, check the runout of the tires. Maximum Tire Runout: 1.0 mm (0.0393 in.) HINT: Measure the runout with the wheel assembly removed from the vehicle. |
|

2. ROTATE TIRES
(a) Remove the wheel assembly.
Click here
(b) Rotate the tires as shown in the illustration.
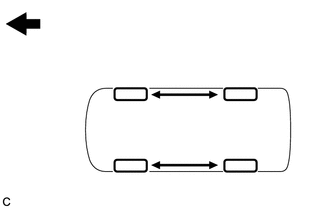
.png) | Front |
(c) Install the wheel assembly.
Click here
(d) Perform initialization.
for HV Model: Click here
for Gasoline Model: Click here
3. INSPECT AND ADJUST WHEEL BALANCE
| (a) Inspect and adjust the off-the-car balance. Maximum Wheel Imbalance: 8.0 g (0.0176 lb) NOTICE:
HINT:
|
|
4. INSPECT FRONT AXLE HUB BEARING
Click here
5. INSPECT REAR AXLE HUB BEARING
Click here
READ NEXT:
 Components
COMPONENTS ILLUSTRATION *1 TIRE PRESSURE WARNING ECU AND RECEIVER - - N*m (kgf*cm, ft.*lbf): Specified torque - -
SEE MORE:
If a warning light turns on or a
warning buzzer sounds
Calmly perform the following actions if any of the warning lights comes
on or
flashes. If a light comes on or flashes, but then goes off, this does not
necessarily
indicate a malfunction in the system. However, if this continues to occur,
have the vehicle inspected by your Lexus dealer.
Acti
Dtc Check / Clear
DTC CHECK / CLEAR CHECK DTC (a) Connect the Techstream to the DLC3. (b) Turn the power switch on (IG). (c) Turn the parking support brake system on. (d) Turn the Techstream on. (e) Enter the following menus: Body Electrical / Advanced Parking Guidance/ICS/Intuitive P/A / Trouble Codes. (f) Check for
