Lexus ES: Inspection
INSPECTION
PROCEDURE
1. INSPECT FRONT STABILIZER LINK ASSEMBLY
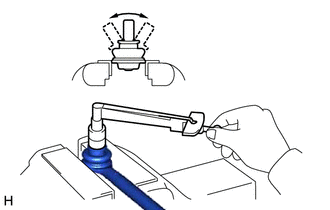
| (a) Inspect the turning torque of the ball joint. (1) Secure the front stabilizer link assembly in a vise using aluminum plates. NOTICE: Do not overtighten the vise. (2) Install the nut to the front stabilizer link assembly stud. (3) Using a torque wrench, turn the stud continuously at a rate of 3 to 5 seconds per turn and take the torque reading on the 5th turn. Turning Torque: 0.05 to 1.96 N*m (0.6 to 19 kgf*cm, 0.5 to 17 in.*lbf) HINT: If the turning torque is not within the specified range, replace the front stabilizer link assembly with a new one. (4) Turn the stud to check that the stud does not catch and there is no play. HINT: If the stud catches or there is play while turning, replace the front stabilizer link assembly with a new one. |
|
(b) Inspect the dust cover.
(1) Check that the dust cover is not cracked and that there is no grease on it.
HINT:
If the dust cover is cracked or there is grease on it, replace the front stabilizer link assembly with a new one.
READ NEXT:
 Installation
INSTALLATION PROCEDURE 1. INSTALL FRONT NO. 1 STABILIZER BAR BUSHING (for LH Side) (a) Install the front No. 1 stabilizer bar bushing to the front stabilizer bar as shown in the illustration. *a
Installation
INSTALLATION PROCEDURE 1. INSTALL FRONT NO. 1 STABILIZER BAR BUSHING (for LH Side) (a) Install the front No. 1 stabilizer bar bushing to the front stabilizer bar as shown in the illustration. *a
SEE MORE:
Stroke Sensor / Reaction Force Pressure Sensor Output Inconsistent (C14B6)
DESCRIPTION DTC No. Detection Item INF Code DTC Detection Condition Trouble Area MIL Note C14B6 Stroke Sensor / Reaction Force Pressure Sensor Output Inconsistent 209 The difference between brake pedal stroke sensor assembly output value and reaction force pressure sensor ou
Components
COMPONENTS ILLUSTRATION *A Type A *B Type B *1 FRONT FLOOR COVER RH - - N*m (kgf*cm, ft.*lbf): Specified torque - - ILLUSTRATION *A Type A *B Type B *1 FRONT FLOOR COVER LH - - N*m (kgf*cm, ft.*lbf): Specified torque - - ILLUSTRATIO
