Lexus ES: Front Turn Signal Light Bulb
Components
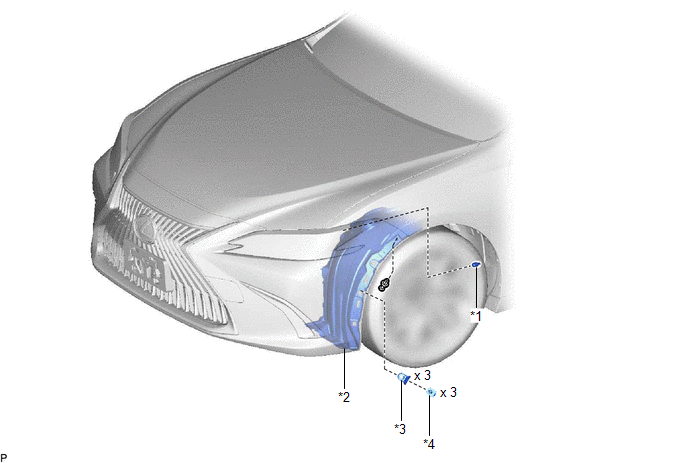
COMPONENTS
ILLUSTRATION
|
*1 |
FRONT TURN SIGNAL LIGHT BULB |
*2 |
REAR FENDER SPLASH SHIELD SUB-ASSEMBLY |
|
*3 |
FRONT FENDER LINER RETAINER |
*4 |
PIN HOLD CLIP |
Removal
REMOVAL
CAUTION / NOTICE / HINT
HINT:
- Use the same procedure for the RH side and LH side.
- The following procedure is for the LH side.
PROCEDURE
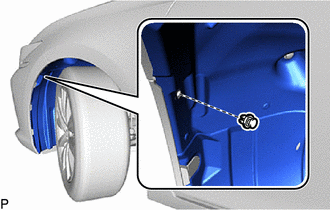
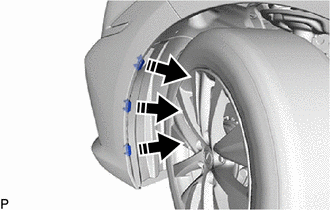
1. SEPARATE REAR FENDER SPLASH SHIELD SUB-ASSEMBLY
|
(a) Remove the clip. |
|
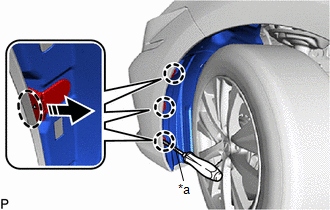
(b) Using a screwdriver with its tip wrapped with protective tape, disengage the 3 claws to separate the rear fender splash shield sub-assembly.
|
*a |
Protective Tape |
.png) |
Insert Screwdriver Here |
.png) |
Remove in this Direction |
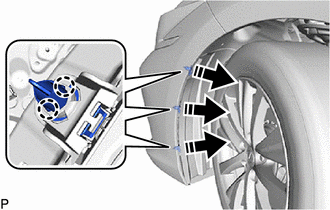
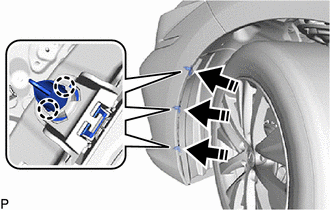
(c) Disengage the 6 claws to remove the 3 pin hold clips from the rear fender splash shield sub-assembly as shown in the illustration.
|
|
Remove in this Direction |
(d) Remove the 3 front fender liner retainers from the rear fender splash shield sub-assembly as shown in the illustration.
|
|
Remove in this Direction |
2. REMOVE FRONT TURN SIGNAL LIGHT BULB
(a) Turn the headlight cord with the front turn signal light bulb as shown in the illustration to disconnect them as a unit.
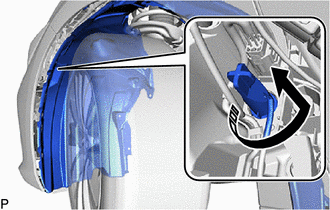
|
|
Disconnect in this Direction |
(b) Remove the front turn signal light bulb from the headlight cord.
Installation
INSTALLATION
CAUTION / NOTICE / HINT
HINT:
- Use the same procedure for the RH side and LH side.
- The following procedure is for the LH side.
PROCEDURE
1. INSTALL FRONT TURN SIGNAL LIGHT BULB
(a) Install the front turn signal light bulb to the headlight cord.
(b) Turn the headlight cord with the front turn signal light bulb as shown in the illustration to install them as a unit.
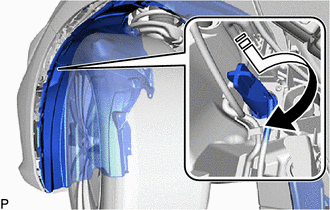
.png) |
Install in this Direction |
2. INSTALL REAR FENDER SPLASH SHIELD SUB-ASSEMBLY
(a) Engage the 3 claws to install the 3 front fender liner retainers to the front bumper assembly as shown in the illustration.
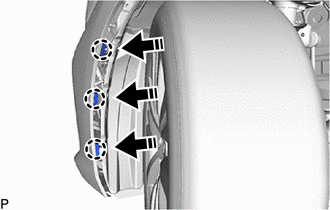
|
|
Install in this Direction |
(b) Engage the 6 claws to install the 3 pin hold clips to the rear fender splash shield sub-assembly as shown in the illustration.
|
|
Install in this Direction |
(c) Install the rear fender splash shield sub-assembly with the clip.
READ NEXT:
 Front Wiper Rubber
Components
COMPONENTS
ILLUSTRATION
*1
FRONT WIPER BLADE
*2
WIPER RUBBER
*3
FRONT WIPER RUBBER BACKING PLATE
-
Outside Vehicle
OUTSIDE VEHICLE
These are maintenance and inspection items that are considered to be
the owner's responsibility.
The owner can do them or they can have them done at a service center
SEE MORE:
On-vehicle Inspection
ON-VEHICLE INSPECTION PROCEDURE 1. INSPECT CAMSHAFT TIMING OIL CONTROL SOLENOID ASSEMBLY (a) Connect the Techstream to the DLC3. (b) Start the engine. (c) Turn the Techstream on. (d) Inspect the camshaft timing oil control solenoid assembly (for intake side). (1) Enter the following menus: Powertrai
Disassembly
DISASSEMBLY PROCEDURE 1. REMOVE SLIDING ROOF DRIVE GEAR SUB-ASSEMBLY (a) Remove the bolt. Remove in this Direction (b) Disengage the claw and guide as shown in the illustration to remove the map light bracket. (c) Remove the 2 bolts and sliding roof drive gear sub-assembly.
