Lexus ES: Engine Coolant Temperature Sensor
Components
COMPONENTS
ILLUSTRATION
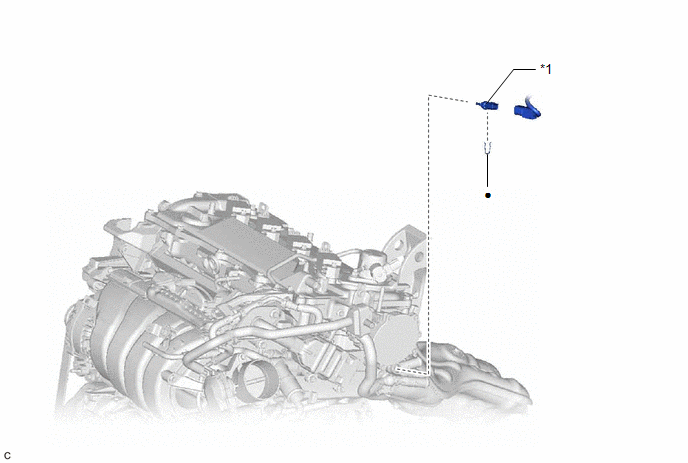
| *1 | ENGINE COOLANT TEMPERATURE SENSOR | - | - |
| ● | Non-reusable part | - | - |
Removal
REMOVAL
CAUTION / NOTICE / HINT
The necessary procedures (adjustment, calibration, initialization or registration) that must be performed after parts are removed and installed, or replaced during engine coolant temperature sensor removal/installation are shown below.
Necessary Procedures After Parts Removed/Installed/Replaced| Replaced Part or Performed Procedure | Necessary Procedure | Effect/Inoperative Function when Necessary Procedure not Performed | Link |
|---|---|---|---|
| Replacement of engine coolant temperature sensor | Inspection after repair |
| |
PROCEDURE
1. DRAIN ENGINE COOLANT
Click here .gif)
2. REMOVE ENGINE COOLANT TEMPERATURE SENSOR
| (a) Disconnect the engine coolant temperature sensor connector. |
|
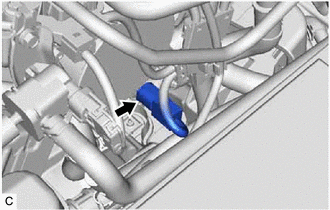
| (b) Remove the clip and engine coolant temperature sensor from the water outlet. NOTICE: If the engine coolant temperature sensor has been struck or dropped, replace it. |
|
Inspection
INSPECTION
PROCEDURE
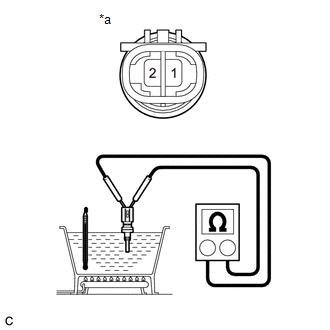
1. INSPECT ENGINE COOLANT TEMPERATURE SENSOR
CAUTION:
- Do not put your hands into the water that has been heated for the inspection.
- Touching the heated water could result in burns.
.png)
| (a) Measure the resistance according to the value(s) in the table below. Standard Resistance:
NOTICE: If checking the engine coolant temperature sensor in water, be careful not to allow water to contact the terminals. After checking, wipe the water off the engine coolant temperature sensor. If the result is not as specified, replace the engine coolant temperature sensor. |
|
Installation
INSTALLATION
PROCEDURE
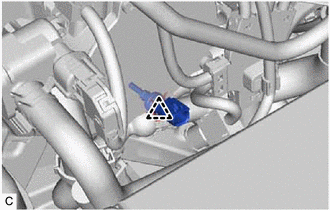
1. INSTALL ENGINE COOLANT TEMPERATURE SENSOR
HINT:
Perform "Inspection After Repair" after replacing the engine coolant temperature sensor.
Click here .gif)
(a) Apply a light coat of engine coolant to the O-ring of the engine coolant temperature sensor.
(b) Install the engine coolant temperature sensor to the water outlet with a new clip.
NOTICE:
- If the engine coolant temperature sensor has been struck or dropped, replace it.
- If reusing the engine coolant temperature sensor, be sure to inspect the O-ring.
- Make sure that the O-ring is not cracked or moved out of place when installing the engine coolant temperature sensor.
(c) Connect the engine coolant temperature sensor connector.
2. ADD ENGINE COOLANT
Click here
3. INSPECT FOR COOLANT LEAK
Click here
4. PERFORM INITIALIZATION
(a) Perform "Inspection After Repair" after replacing the engine coolant temperature sensor.
Click here
READ NEXT:
 Ignition Coil And Spark Plug
RemovalREMOVAL CAUTION / NOTICE / HINT The necessary procedures (adjustment, calibration, initialization or registration) that must be performed after parts are removed and installed, or replaced dur
Parts Location
PARTS LOCATION ILLUSTRATION *1 ECM *2 NO. 1 ENGINE ROOM RELAY BLOCK AND NO. 1 JUNCTION BLOCK ASSEMBLY - INJ FUSE *3 IGNITION COIL ASSEMBLY *4 SPARK PLUG
SEE MORE:
Operation Check
OPERATION CHECK CHECK WINDSHIELD DEICER SYSTEM (a) Turn the power switch on (IG). (b) Check that the windshield deicer wire (windshield glass) becomes warm by operating the front wiper deicer switch. (c) Confirm that windshield deicer system operation stops after approximately 15 minutes. NOTICE: If
Motor Drive Permission Malfunction (C1451)
DESCRIPTION If air bleeding has not been performed, the skid control ECU (brake booster with master cylinder assembly) stores DTC C1451 to prevent the entry of air due to pump motor operation. DTC C1451 is stored when Motor Invalid is selected, the system will not return to normal until the air blee
