Lexus ES: Dtc Check / Clear
DTC CHECK / CLEAR
NOTICE:
When the diagnosis system is changed from normal mode to check mode or vice versa, all DTCs and Freeze Frame Data recorded in normal mode are cleared. Before changing modes, always check and make a note of DTCs and Freeze Frame Data.
HINT:
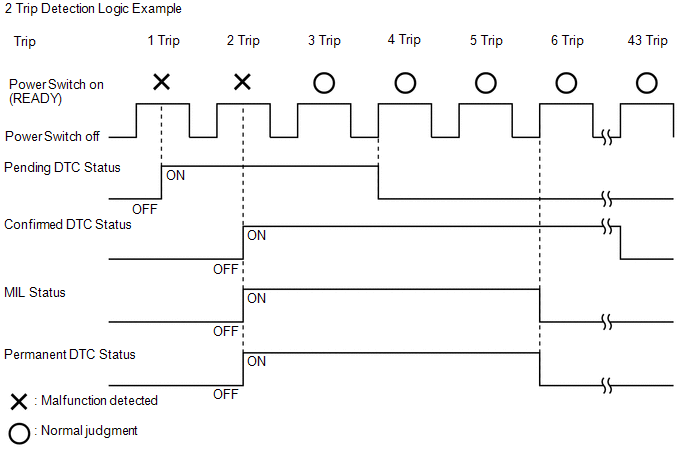
- DTCs which are stored in the ECM can be displayed on the Techstream. The Techstream can display the confirmed, pending and permanent DTCs.
- If a malfunction is detected during the current driving cycle, confirmed and permanent DTCs are stored.
- Some DTCs are not stored if the ECM does not detect the same malfunction again during a second consecutive driving cycle. However, such malfunctions, detected on only one occasion, are stored as pending DTCs.
- Confirmed and pending DTCs can be cleared by using the Techstream or by disconnecting the cable from the negative (-) auxiliary battery terminal. However, permanent DTCs cannot be cleared using either of these two methods.
-
After clearing current DTCs using the Techstream (or by disconnecting the cable from the negative (-) auxiliary battery terminal), permanent DTCs can be cleared when the universal trip is performed and then the system is determined to be normal for the relevant DTCs. The driving pattern to obtain a normal judgment is described under the "Confirmation Driving Pattern" for the respective DTC.
To clear permanent DTCs, all of the following conditions must be are met:
- There is a history that universal trip driving was performed.
- The vehicle has been judged as normal for 2 trips. (Normal judgment does not have to be performed in 2 consecutive trip, but normal judgment should occur in the latest trip.) (not for misfire and fuel system DTCs)
- No malfunctions are detected.
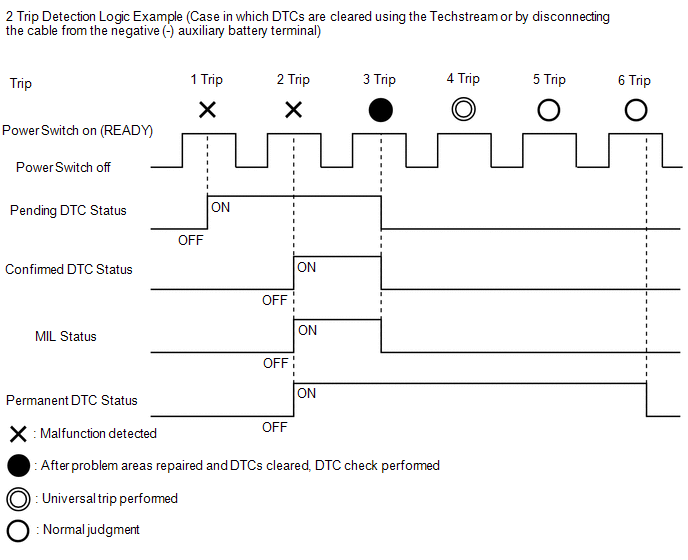
| Pending DTC | Store condition | Malfunction detected |
| Clear condition | System determined to be normal or DTCs cleared using Techstream or Cable disconnected from negative (-) auxiliary battery terminal | |
| Confirmed DTC | Store condition | Malfunction detected (2nd trip) |
| Clear condition | No malfunctions in 40 driving cycles or DTCs cleared using Techstream or Cable disconnected from negative (-) auxiliary battery terminal | |
| Permanent DTC | Store condition | Malfunction detected (2nd trip) |
| Clear condition | Power switch turned to on (IG) after normal judgment obtained in 3 consecutive driving cycles or After DTCs cleared using Techstream or cable disconnected from negative (-) auxiliary battery terminal, universal trip performed and normal judgment obtained for 2 trips (not for misfire and fuel system DTCs) or After DTCs cleared using Techstream or cable disconnected from negative (-) auxiliary battery terminal, malfunction not detected when universal trip driving performed (misfire and fuel system DTCs) | |
| MIL | ON | Malfunction detected (2nd trip) |
| OFF | Power switch turned to on (IG) after normal judgment obtained in 3 consecutive driving cycles or DTCs cleared using Techstream or Cable disconnected from negative (-) auxiliary battery terminal |
HINT:
- Obtaining a normal judgment and performing a universal trip driving pattern can be done in the same driving cycle or in different driving cycles.
- It is unnecessary to obtain a normal judgment if the output DTCs are misfire or fuel system DTCs.
CHECK DTC
(a) Connect the Techstream to the DLC3.
(b) Turn the power switch on (IG).
(c) Turn the Techstream on.
(d) Enter the following menus: Powertrain / Engine / Trouble Codes.
Powertrain > Engine > Trouble Codes(e) Check the DTC(s) and Freeze Frame Data, and then write them down.
| Techstream Display | Description |
|---|---|
| Test Failed | Shows the malfunction judgment results during the current trip. |
| Pending | Shows the malfunction judgment results up to now. (Indicates the possibility of a malfunction when no DTC is confirmed.) |
| Confirmed | Shows the DTCs confirmed up to now. (The number of current trips differs for each DTC.) |
(f) Check the details of the DTC(s).
Click here .gif)
CHECK TIME STAMP
HINT:
By checking Time Stamp, the time and order in which DTCs were stored in an ECU can be checked.
(a) Connect the Techstream to the DLC3.
(b) Turn the power switch on (IG).
(c) Turn the Techstream on.
(d) Enter the following menus: Health Check.
(e) Perform the following steps when the data setting screen is displayed.
(f) Select the systems for which to perform Health Check and check for time stamp data.
- Powertrain
- Chassis
- Body
- Store All Data
(g) Select "Yes" when "Do you want to store time stamp data?" is displayed.
HINT:
If "Yes" is not selected, time stamp data will not be stored.
(h) After Health Check has completed, select "Time Stamp Data" to display the Time Stamp screen.
(i) Select the desired system from the drop-down list on the bottom of the Time Stamp screen.
(j) Check the order and time which DTCs were stored for the selected system.
CLEAR DTC (Pending and Confirmed DTC)
(a) Connect the Techstream to the DLC3.
(b) Turn the power switch on (IG).
(c) Turn the Techstream on.
(d) Enter the following menus: Powertrain / Engine / Trouble Codes.
(e) Clear the DTCs.
Powertrain > Engine > Clear DTCsCLEAR DTC (Pending and Confirmed DTC without using Techstream)
(a) Perform either of the following operations:
NOTICE:
After turning power switch off, waiting time may be required before disconnecting the cable from the negative (-) auxiliary battery terminal. Therefore, make sure to read the disconnecting the cable from the negative (-) auxiliary battery terminal notices before proceeding with work.
Click here
(1) Disconnect the cable from the negative (-) auxiliary battery terminal for more than 1 minute.
(2) Remove the EFI-MAIN NO. 4 fuse from the No. 1 engine room relay block and No. 1 junction block assembly located inside the engine compartment for more than 1 minute.
- After clearing current DTCs using the Techstream (or by disconnecting the cable from the negative (-) auxiliary battery terminal), permanent DTCs can be cleared when the universal trip is performed and then the system is determined to be normal for the relevant DTCs. The driving pattern to obtain a normal judgment is described under the "Confirmation Driving Pattern" for the respective DTC.
-
To clear permanent DTCs, all of the following conditions must be are met:
- There is a history that universal trip driving was performed.
- The vehicle has been judged as normal for 2 trips. (Normal judgment does not have to be performed in 2 consecutive trip, but normal judgment should occur in the latest trip.) (not for misfire and fuel system DTCs)
- No malfunctions are detected.
CLEAR PERMANENT DTC
(a) Connect the Techstream to the DLC3.
(b) Turn the power switch on (IG).
(c) Turn the Techstream on.
(d) Enter the following menus: Powertrain / Engine / Trouble Codes.
Powertrain > Engine > Trouble CodesHINT:
If "PERMANENT" in the top right of the screen displays "YES", permanent DTCs are stored.
(e) Select the "Generic" tab.
(f) Check if permanent DTCs are stored.
HINT:
If permanent DTCs are not output, it is not necessary to continue this procedure.
(g) Clear the DTCs.
Powertrain > Engine > Clear DTCsNOTICE:
Do not clear the DTCs or disconnect the cable from the auxiliary battery terminal after performing this step.
(h) Perform the universal trip.
HINT:
The driving pattern to obtain a normal judgment and the universal trip driving can be performed consecutively in the same driving cycle.
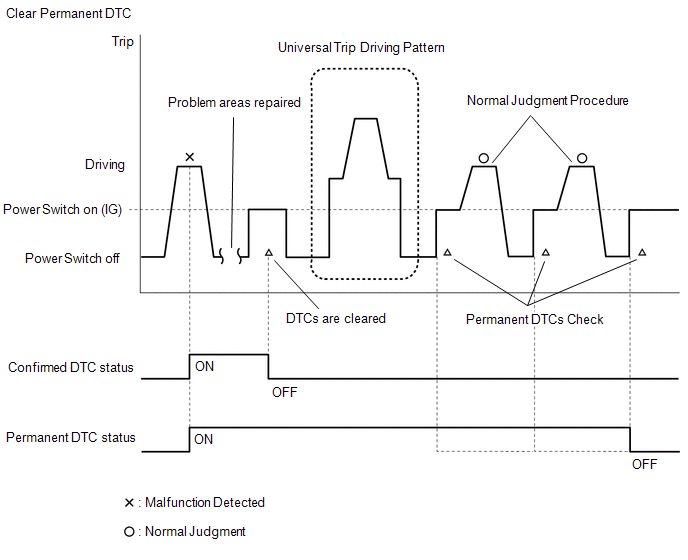
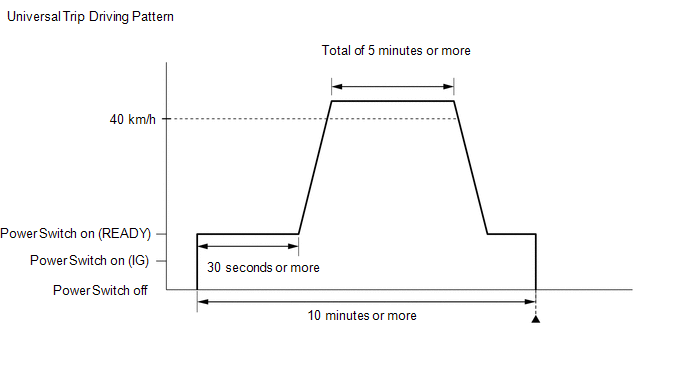
- Turn the power switch on (READY) and wait for 30 seconds or more.
-
Drive the vehicle at 40 km/h (25 mph) or more for a total of 5 minutes or more.
CAUTION:
When performing a driving pattern, obey all speed limits and traffic laws.
HINT:
It is possible to complete the drive pattern even if the vehicle decelerates to less than 40 km/h (25 mph) during the driving cycle provided that the vehicle is driven at 40 km/h (25 mph) or more for a total of 5 minutes.
- Allow 10 minutes or more to elapse from the time the power switch turned on (READY).
(i) Turn the power switch off and wait for 2 minutes or more.
(j) Turn the power switch on (IG).
(k) Enter the following menus: Powertrain / Engine / Trouble Codes.
Powertrain > Engine > Trouble Codes(l) Check that the permanent DTCs have been cleared.
HINT:
If permanent DTCs are not output, it is not necessary to continue this procedure.
(m) Perform the normal judgment procedure in the respective confirmation driving pattern of each output DTC.
HINT:
- Confirmation driving patterns do not need to be performed for misfire and fuel system DTCs.
- Do not turn the power switch off by mistake during this step.
(n) With the power switch on (READY) wait for 5 seconds or more. (Except when the power switch is already turned on (READY) or the engine is running)
(o) Turn the power switch off and wait for 2 minutes or more.
(p) Turn the power switch on (IG).
(q) Enter the following menus: Powertrain / Engine / Trouble Codes.
Powertrain > Engine > Trouble Codes(r) Check that the permanent DTCs have been cleared.
HINT:
If permanent DTCs are not output, it is not necessary to continue this procedure.
(s) Perform the normal judgment procedure in the respective confirmation driving pattern of each output DTC.
HINT:
- Confirmation driving patterns do not need to be performed for misfire and fuel system DTCs.
- Do not turn the power switch off by mistake during this step.
(t) With the power switch on (READY) wait for 5 seconds or more. (Except when the power switch is already turned on (READY) or the engine is running)
(u) Turn the power switch off and wait for 2 minutes or more.
(v) Turn the power switch on (IG).
(w) Enter the following menus: Powertrain / Engine / Trouble Codes.
Powertrain > Engine > Trouble Codes(x) Check that the permanent DTCs have been cleared.
READ NEXT:
 Freeze Frame Data
FREEZE FRAME DATA DESCRIPTION The ECM records vehicle and driving condition information as Freeze Frame Data the moment a DTC is stored. When troubleshooting, Freeze Frame Data can be helpful in deter
Check Mode Procedure
CHECK MODE PROCEDURE HINT: Compared to normal mode, check mode is more sensitive to malfunctions. Therefore, check mode can detect malfunctions that cannot be detected in normal mode. NOTICE: All of t
Fail-safe Chart
FAIL-SAFE CHART If any of the following DTCs are stored, the ECM enters fail-safe mode to allow the vehicle to be driven temporarily or stops fuel injection. DTC Code Component Fail-Safe Operat
SEE MORE:
Adjustment
ADJUSTMENT CAUTION / NOTICE / HINT *a Centering Bolt *b Standard Bolt HINT:
Centering bolts are used to install the hood hinges and hood lock. The hood and hood lock cannot be adjusted with the centering bolts installed. Substitute the centering bolts with standard bolts with washe
Removal
REMOVAL CAUTION / NOTICE / HINT HINT:
Use the same procedure for the RH side and LH side.
The following procedure is for the LH side.
PROCEDURE 1. REMOVE REAR POWER WINDOW REGULATOR SWITCH ASSEMBLY WITH REAR DOOR UPPER ARMREST BASE PANEL Click here 2. REMOVE REAR DOOR TRIM UPPER PAD Clic
