Lexus ES: Disassembly
Lexus ES (XZ10) Service Manual / Engine & Hybrid System / 2gr-fks (lubrication) / Oil Pump / Disassembly
DISASSEMBLY
PROCEDURE
1. REMOVE OIL PUMP RELIEF VALVE
| (a) Using a 27 mm socket wrench, remove the oil pump relief valve plug from the oil pump cover. |
|
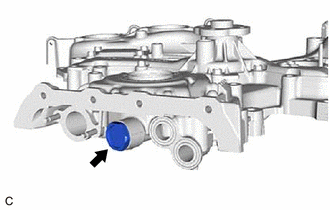
(b) Remove the oil pump relief valve spring and oil pump relief valve from the valve hole.
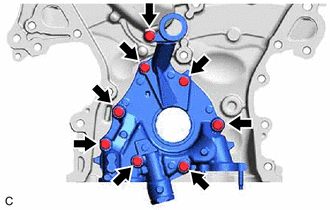
2. REMOVE OIL PUMP COVER
| (a) Remove the 8 bolts and oil pump cover from the timing chain cover assembly. |
|
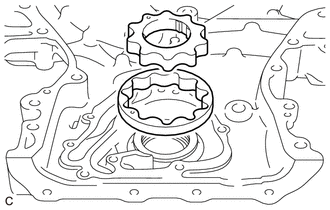
3. REMOVE OIL PUMP ROTOR SET
| (a) Remove the drive rotor and driven rotor from the timing chain cover assembly. |
|
READ NEXT:
 Inspection
INSPECTION PROCEDURE 1. INSPECT OIL PUMP RELIEF VALVE (a) Coat the oil pump relief valve with engine oil and check that it falls smoothly into the valve hole by its own weight. HINT: If the oil pum
Reassembly
REASSEMBLY PROCEDURE 1. INSTALL OIL PUMP ROTOR SET (a) Coat the drive rotor and driven rotor with engine oil and place them into the timing chain cover assembly with the rotor marks facing up. Chec
Installation
INSTALLATION PROCEDURE 1. INSTALL TIMING CHAIN COVER ASSEMBLY (a) Clean the contact surfaces of the engine assembly, and confirm that no oil, moisture, or other foreign matter is on the surfaces.
SEE MORE:
Components
COMPONENTS ILLUSTRATION *A w/o Rear Sunshade *B w/ Rear Sunshade *1 CENTER STOP LIGHT SET *2 NO. 2 PACKAGE TRAY TRIM PANEL ASSEMBLY *3 PACKAGE TRAY TRIM PANEL ASSEMBLY *4 REAR SEAT OUTER BELT ASSEMBLY LH *5 REAR SEAT OUTER BELT ASSEMBLY RH *6 REAR SEAT SHOULDE
How To Proceed With Troubleshooting
CAUTION / NOTICE / HINT HINT:
Before performing troubleshooting for the road sign assist system, make sure that the pre-collision system and lane control system are not malfunctioning.
Pre-collision system: Click here Lane control system: Click here
Perform the following procedure to troubl
© 2016-2026 Copyright www.lexguide.net
