Lexus ES: Components
COMPONENTS
ILLUSTRATION
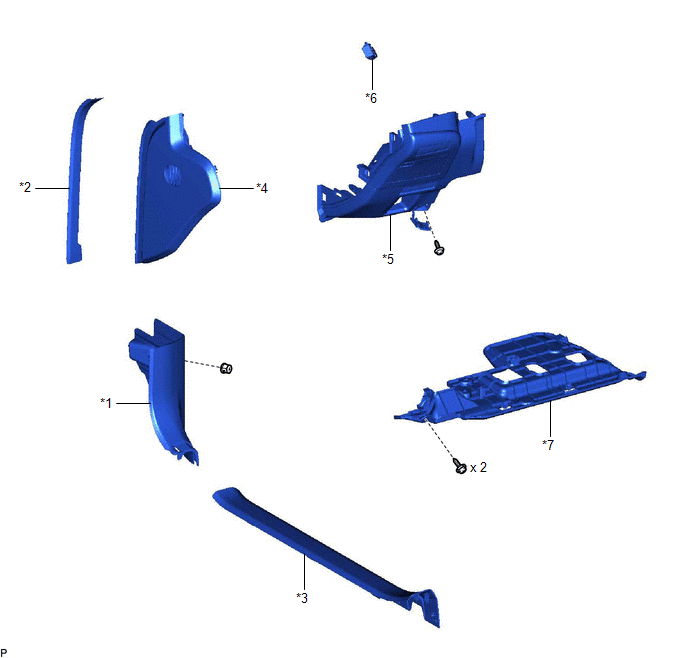
| *1 | COWL SIDE TRIM BOARD LH | *2 | FRONT DOOR OPENING TRIM COVER LH |
| *3 | FRONT DOOR SCUFF PLATE LH | *4 | INSTRUMENT SIDE PANEL LH |
| *5 | LOWER INSTRUMENT PANEL FINISH PANEL SUB-ASSEMBLY | *6 | NO. 1 CLEARANCE WARNING BUZZER |
| *7 | NO. 1 INSTRUMENT PANEL UNDER COVER SUB-ASSEMBLY | - | - |
READ NEXT:
 Installation
INSTALLATION PROCEDURE 1. INSTALL NO. 1 CLEARANCE WARNING BUZZER (a) Connect the connector. (b) Engage the clamp to install the No. 1 clearance warning buzzer. 2. INSTALL LOWER INSTRUMENT PANEL FINISH
Removal
REMOVAL PROCEDURE 1. REMOVE FRONT DOOR SCUFF PLATE LH Click here 2. REMOVE COWL SIDE TRIM BOARD LH Click here 3. REMOVE FRONT DOOR OPENING TRIM COVER LH Click here 4. REMOVE INSTRUMENT SIDE P
SEE MORE:
Active Noise Control ECU Communication Stop Mode
DESCRIPTION Detection Item Symptom Trouble Area Active Noise Control ECU Communication Stop Mode Any of the following conditions are met:
Communication stop for "Active Noise Control" is indicated on the "Communication Bus Check" screen of the Techstream.
Click here
Communicati
Drive Motor "A" Phase V Current(High Resolution) Circuit Short to Battery (P0A6012,...,P0A631F)
DESCRIPTION The motor generator control ECU (MG ECU), which is built into the inverter with converter assembly, monitors its internal operation and will store DTCs if it detects a malfunction. DTC No. Detection Item DTC Detection Condition Trouble Area MIL Warning Indicate P0A6012
© 2016-2026 Copyright www.lexguide.net
