
Lexus ES: Components
COMPONENTS
ILLUSTRATION
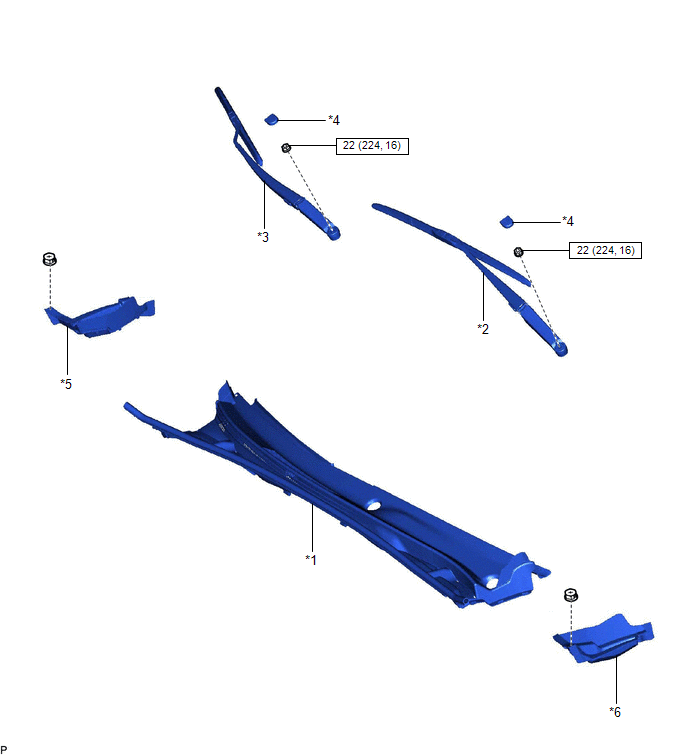
| *1 | COWL TOP VENTILATOR LOUVER SUB-ASSEMBLY | *2 | FRONT WIPER ARM AND BLADE ASSEMBLY LH |
| *3 | FRONT WIPER ARM AND BLADE ASSEMBLY RH | *4 | FRONT WIPER ARM HEAD CAP |
| *5 | NO. 2 COWL TOP PANEL INSULATOR | *6 | NO. 3 COWL TOP PANEL INSULATOR |
 | N*m (kgf*cm, ft.*lbf): Specified torque | - | - |
ILLUSTRATION
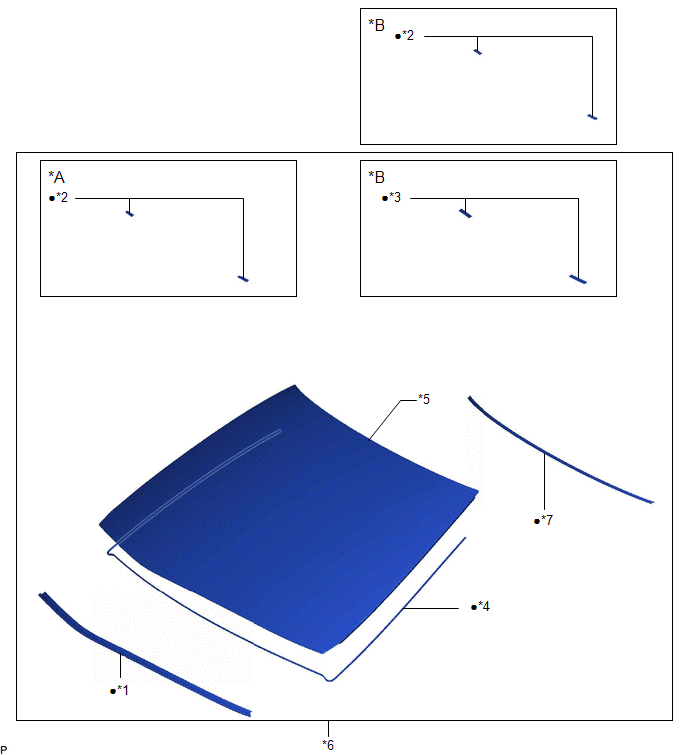
| *A | for 1-piece Type | *B | for 2-piece Type |
| *1 | FRONT WINDOW INNER CENTER MOULDING | *2 | NO. 1 WINDSHIELD GLASS STOPPER |
| *3 | NO. 2 WINDSHIELD GLASS STOPPER | *4 | WINDOW GLASS ADHESIVE DAM |
| *5 | WINDSHIELD GLASS | *6 | WINDSHIELD GLASS SUB-ASSEMBLY |
| *7 | WINDSHIELD OUTSIDE MOULDING | - | - |
| ● | Non-reusable part | - | - |
READ NEXT:
 Removal
REMOVAL CAUTION / NOTICE / HINT The necessary procedures (adjustment, calibration, initialization or registration) that must be performed after parts are removed and installed, or replaced during wind
Installation
INSTALLATION CAUTION / NOTICE / HINT NOTICE: When replacing the windshield glass of a vehicle equipped with a forward recognition camera, make sure to use a Lexus genuine part. If a non-Lexus genuine
SEE MORE:
Power Source Circuit
DESCRIPTION This circuit provides power to operate the blind spot monitor sensor. WIRING DIAGRAM CAUTION / NOTICE / HINT NOTICE: Inspect the fuses for circuits related to this system before performing the following procedure. PROCEDURE 1. CHECK HARNESS AND CONNECTOR (BLIND SPOT MONITOR SENSOR
Disassembly
DISASSEMBLY PROCEDURE 1. SEPARATE FRONT NO. 2 AXLE INBOARD JOINT BOOT CLAMP (a) Secure the drive shaft in a vise between aluminum plates. NOTICE: Do not overtighten the vise. (b) Using pliers, separate the front No. 2 axle inboard joint boot clamp as shown in the illustration. 2. SEPA
© 2016-2026 Copyright www.lexguide.net
