Lexus ES: Components
Lexus ES (XZ10) Service Manual / Vehicle Interior / Mirror (ext) / Outer Mirror Control Ecu / Components
COMPONENTS
ILLUSTRATION
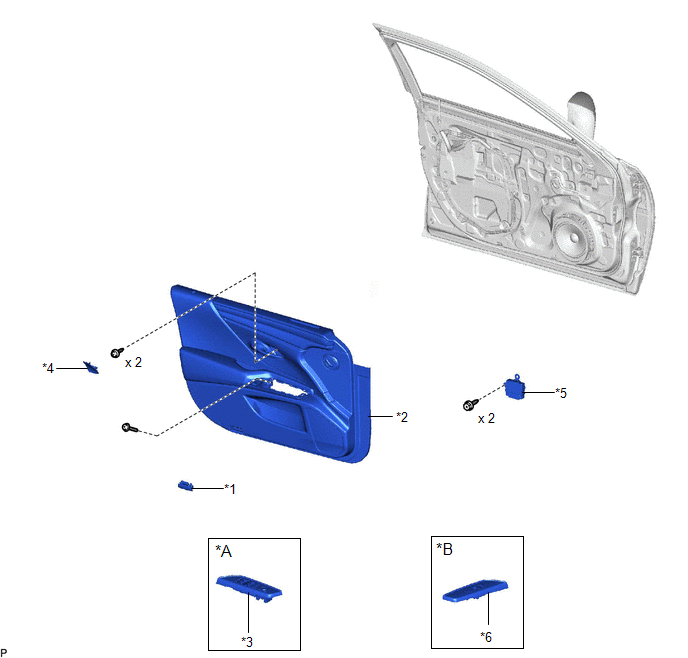
| *A | for Driver Side | *B | for Front Passenger Side |
| *1 | COURTESY LIGHT ASSEMBLY | *2 | FRONT DOOR TRIM BOARD SUB-ASSEMBLY |
| *3 | MULTIPLEX NETWORK MASTER SWITCH ASSEMBLY WITH FRONT DOOR UPPER ARMREST BASE PANEL | *4 | NO. 2 DOOR TRIM PAD |
| *5 | OUTER MIRROR CONTROL ECU ASSEMBLY | *6 | POWER WINDOW REGULATOR SWITCH ASSEMBLY WITH FRONT DOOR UPPER ARMREST BASE PANEL |
READ NEXT:
 Removal
REMOVAL CAUTION / NOTICE / HINT HINT:
Use the same procedure for the RH side and LH side.
The following procedure is for the LH side.
PROCEDURE 1. REMOVE NO. 2 DOOR TRIM PAD Click here 2.
Installation
INSTALLATION CAUTION / NOTICE / HINT HINT:
Use the same procedure for the RH side and LH side.
The following procedure is for the LH side.
PROCEDURE 1. INSTALL OUTER MIRROR CONTROL ECU ASSEMBL
SEE MORE:
Drive Motor "A" Position Sensor Circuit Voltage Below Threshold (P0A3F16,P0A3F1F)
DTC SUMMARY MALFUNCTION DESCRIPTION These DTCs indicate that the resolver output signal is abnormal. The cause of this malfunction may be one of the following: Area Main Malfunction Description Inverter low-voltage circuit The connectors are not connected properly Hybrid Vehicle Trans
ABS Warning Light Remains ON
DESCRIPTION This procedure is for troubleshooting when the ABS warning light remains on but no DTCs are output. The skid control ECU (brake actuator assembly) controls the ABS warning light in the combination meter assembly via CAN communication. CAUTION / NOTICE / HINT NOTICE:
After replacing th
© 2016-2026 Copyright www.lexguide.net
