Lexus ES: Components
COMPONENTS
ILLUSTRATION
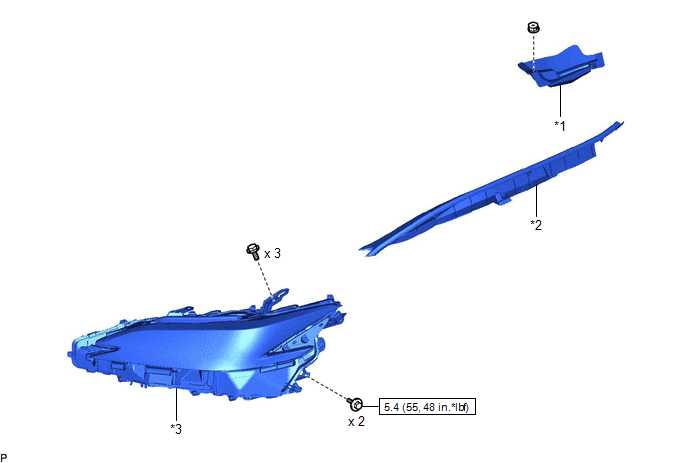
| *1 | COWL TOP PANEL INSULATOR | *2 | FRONT FENDER SPLASH SHIELD SUB-ASSEMBLY |
| *3 | HEADLIGHT ASSEMBLY | - | - |
.png) | N*m (kgf*cm, ft.*lbf): Specified torque | - | - |
ILLUSTRATION
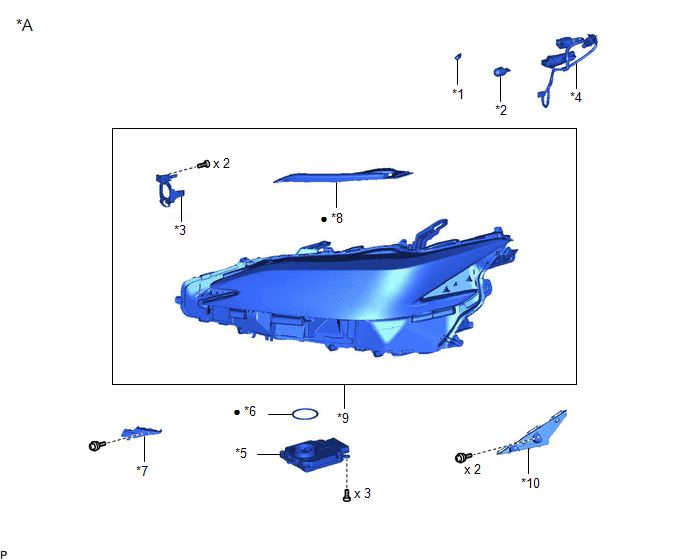
| *A | for TMC Made | - | - |
| *1 | FRONT SIDE MARKER LIGHT BULB | *2 | FRONT TURN SIGNAL LIGHT BULB |
| *3 | HEADLIGHT BRACKET | *4 | HEADLIGHT CORD |
| *5 | HEADLIGHT ECU SUB-ASSEMBLY | *6 | HEADLIGHT GASKET |
| *7 | HEADLIGHT RIM | *8 | HEADLIGHT SEAL |
| *9 | HEADLIGHT UNIT ASSEMBLY | *10 | NO. 2 HEADLIGHT FITTING RIM |
| ● | Non-reusable part | - | - |
ILLUSTRATION
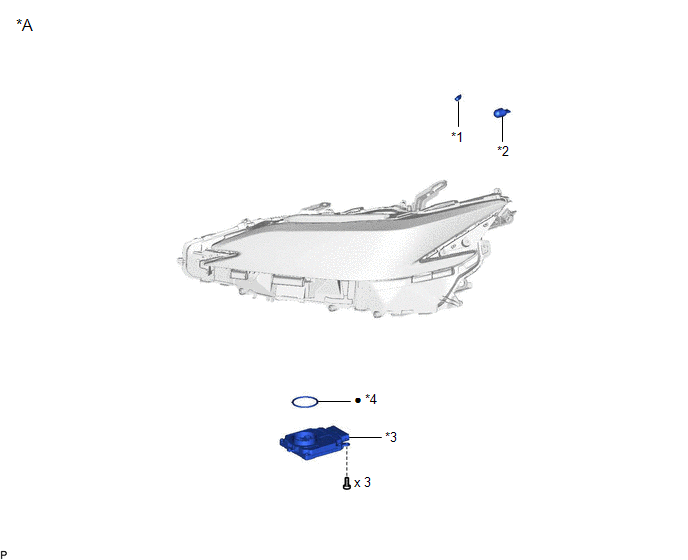
| *A | for TMMK Made | - | - |
| *1 | FRONT SIDE MARKER LIGHT BULB | *2 | FRONT TURN SIGNAL LIGHT BULB |
| *3 | HEADLIGHT ECU SUB-ASSEMBLY | *4 | HEADLIGHT GASKET |
| ● | Non-reusable part | - | - |
ILLUSTRATION
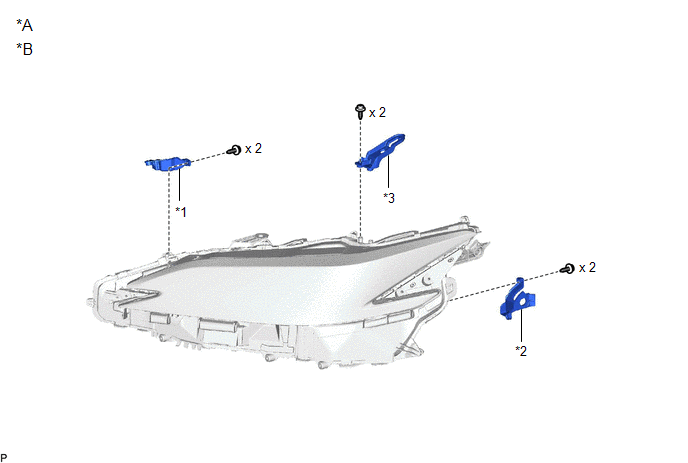
| *A | Bracket for Repair | *B | for TMC Made |
| *1 | LOWER HEADLIGHT PROTECTOR RETAINER | *2 | LOWER NO. 2 HEADLIGHT PROTECTOR RETAINER |
| *3 | UPPER HEADLIGHT PROTECTOR RETAINER | - | - |
READ NEXT:
 Removal
REMOVAL CAUTION / NOTICE / HINT The necessary procedures (adjustment, calibration, initialization or registration) that must be performed after parts are removed and installed, or replaced during head
Disassembly
DISASSEMBLY CAUTION / NOTICE / HINT HINT:
Use the same procedure for the RH side and LH side.
The following procedure is for the LH side.
PROCEDURE 1. REMOVE HEADLIGHT ECU SUB-ASSEMBLY Click h
Adjustment
ADJUSTMENT CAUTION / NOTICE / HINT HINT:
Use the same procedure for the RH side and LH side.
The following procedure is for the LH side.
PROCEDURE 1. PREPARE VEHICLE FOR HEADLIGHT AIM ADJUSTME
SEE MORE:
How To Proceed With Troubleshooting
CAUTION / NOTICE / HINT HINT: *: Use the Techstream. PROCEDURE 1. VEHICLE BROUGHT TO WORKSHOP
NEXT 2. CUSTOMER PROBLEM ANALYSIS (a) Interview the customer and confirm the problem. Click here
NEXT 3. CHECK DTC AND FREEZE FRAME DATA* (a) C
Terminals Of Ecu
TERMINALS OF ECU MULTIPLEX TILT AND TELESCOPIC ECU *a Component with harness connected (Multiplex Tilt and Telescopic ECU) - - (a) Measure the voltage and resistance according to the value(s) in the table below. HINT: Inspect the connectors from the back side while the connectors are co
© 2016-2026 Copyright www.lexguide.net
