
Lexus ES: Components
COMPONENTS
ILLUSTRATION
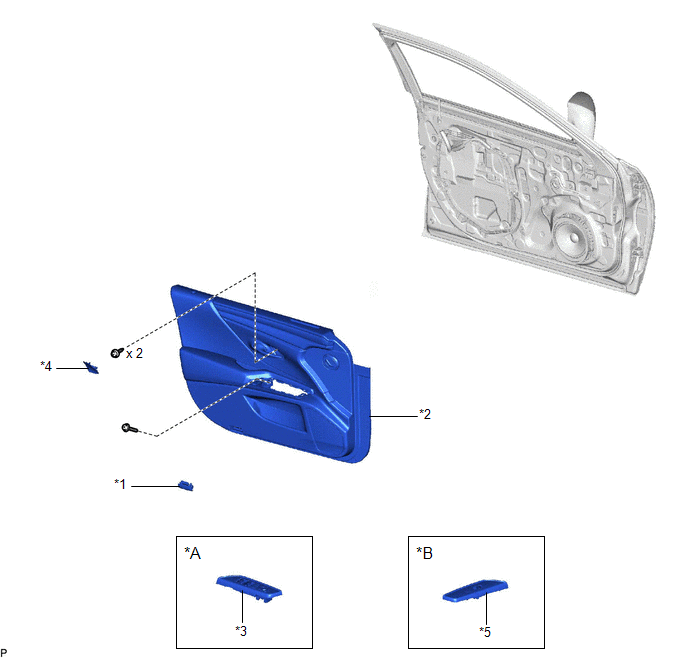
| *A | for Driver Side | *B | for Front Passenger Side |
| *1 | COURTESY LIGHT ASSEMBLY | *2 | FRONT DOOR TRIM BOARD SUB-ASSEMBLY |
| *3 | MULTIPLEX NETWORK MASTER SWITCH ASSEMBLY WITH FRONT DOOR UPPER ARMREST BASE PANEL | *4 | NO. 2 DOOR TRIM PAD |
| *5 | POWER WINDOW REGULATOR SWITCH ASSEMBLY WITH FRONT DOOR UPPER ARMREST BASE PANEL | - | - |
ILLUSTRATION
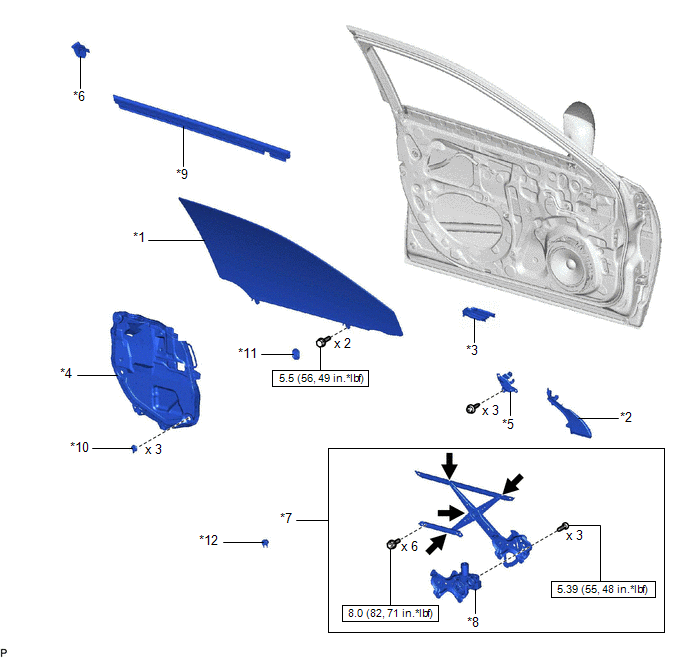
| *1 | FRONT DOOR GLASS SUB-ASSEMBLY | *2 | FRONT DOOR LOWER FRAME BRACKET GARNISH |
| *3 | FRONT DOOR PANEL PROTECTOR | *4 | FRONT DOOR SERVICE HOLE COVER |
| *5 | FRONT DOOR TRIM BRACKET | *6 | FRONT DOOR VENT SEAL |
| *7 | FRONT DOOR WINDOW REGULATOR ASSEMBLY | *8 | POWER WINDOW REGULATOR MOTOR ASSEMBLY |
| *9 | FRONT DOOR INNER GLASS WEATHERSTRIP | *10 | FRONT DOOR WEATHERSTRIP CLIP |
| *11 | HOLE PLUG | *12 | FRONT DOOR NO. 2 SERVICE HOLE COVER |
.png) | N*m (kgf*cm, ft.*lbf): Specified torque | .png) | MP grease |
READ NEXT:
 Removal
REMOVAL CAUTION / NOTICE / HINT The necessary procedures (adjustment, calibration, initialization, or registration) that must be performed after parts are removed and installed, or replaced during pow
Inspection
INSPECTION PROCEDURE 1. INSPECT POWER WINDOW REGULATOR MOTOR ASSEMBLY (FOR DRIVER DOOR) (a) Connect a positive (+) lead from the auxiliary battery to connector terminal 2. NOTICE: Do not connect a
Installation
INSTALLATION CAUTION / NOTICE / HINT HINT:
Use the same procedure for the RH side and LH side.
The following procedure is for the LH side.
PROCEDURE 1. PRECAUTION NOTICE: After turning the eng
SEE MORE:
Installation
INSTALLATION PROCEDURE 1. INSTALL RADIATOR SHUTTER SUB-ASSEMBLY (a) Engage the 2 guides as shown in the illustration. Install in this Direction (b) Install the radiator shutter sub-assembly with the 3 bolts. Torque: 5.5 N·m {56 kgf·cm, 49 in·lbf} (c) Engage the clamp. (d) Connect the c
Operation Check
OPERATION CHECK CHECK AUTO OPERATION FUNCTION NOTICE:
Make sure that initialization has been completed before performing this inspection.
Click here
The sliding roof auto operation can be customized. Make sure that the auto operation customize setting is set to ON.
Click here HINT: When
© 2016-2026 Copyright www.lexguide.net
