
Lexus ES: Components
COMPONENTS
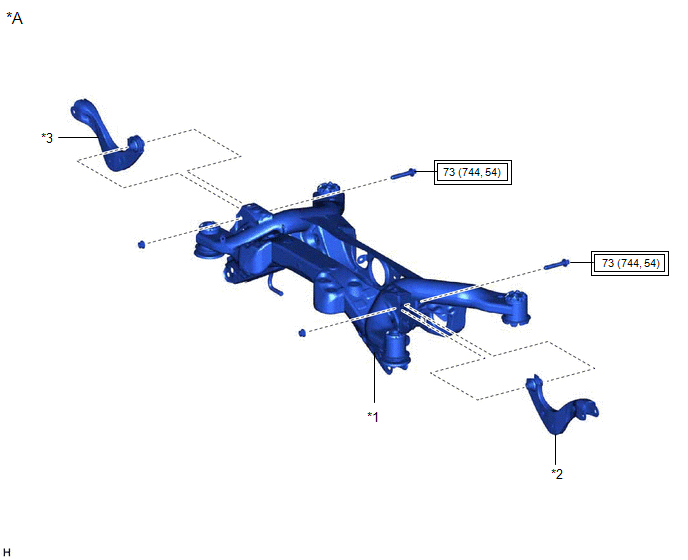
ILLUSTRATION

| *A | for 2WD | - | - |
| *1 | REAR SUSPENSION MEMBER SUB-ASSEMBLY | *2 | REAR UPPER CONTROL ARM ASSEMBLY LH |
| *3 | REAR UPPER CONTROL ARM ASSEMBLY RH | - | - |
.png) | Tightening torque for "Major areas involving basic vehicle performance such as moving/turning/stopping": N*m (kgf*cm, ft.*lbf) | - | - |
ILLUSTRATION
| *A | for AWD | - | - |
| *1 | REAR SUSPENSION MEMBER SUB-ASSEMBLY | *2 | REAR UPPER CONTROL ARM ASSEMBLY LH |
| *3 | REAR UPPER CONTROL ARM ASSEMBLY RH | - | - |
| | Tightening torque for "Major areas involving basic vehicle performance such as moving/turning/stopping": N*m (kgf*cm, ft.*lbf) | - | - |
READ NEXT:
 Installation
INSTALLATION PROCEDURE 1. INSTALL REAR UPPER CONTROL ARM ASSEMBLY LH (a) Temporarily install the rear upper control arm assembly LH to the rear suspension member sub-assembly with the bolt and nut.
Removal
REMOVAL CAUTION / NOTICE / HINT The necessary procedures (adjustment, calibration, initialization, or registration) that must be performed after parts are removed and installed, or replaced during rea
Installation
INSTALLATION PROCEDURE 1. INSTALL REAR UPPER CONTROL ARM ASSEMBLY LH (for 2WD) (a) Temporarily install the rear upper control arm assembly LH to the rear suspension member sub-assembly with the bol
SEE MORE:
System Diagram
SYSTEM DIAGRAM Communication Table Sender Receiver Signal Line Certification ECU (Smart Key ECU Assembly) Main Body ECU (Multiplex Network Body ECU) Luggage compartment door lock assembly open operation signal CAN
Precaution
PRECAUTION PRECAUTION FOR DISCONNECTING CABLE FROM NEGATIVE AUXILIARY BATTERY TERMINAL NOTICE:
After the power switch is turned off, the radio receiver assembly records various types of memory and settings. As a result, after turning the power switch off, make sure to wait at least 60 seconds bef
© 2016-2026 Copyright www.lexguide.net
