
Lexus ES: Components
COMPONENTS
ILLUSTRATION
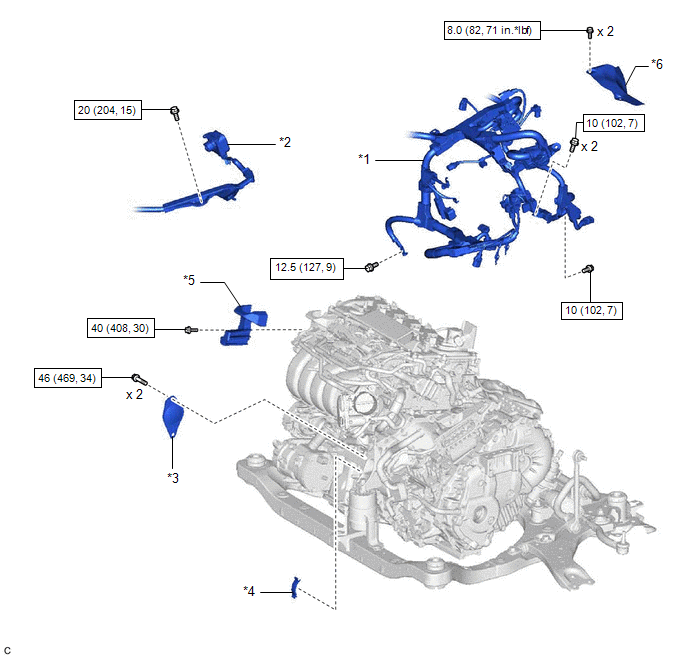
| *1 | ENGINE WIRE | *2 | HV AIR CONDITIONING WIRE |
| *3 | STARTER HOLE INSULATOR | *4 | FLYWHEEL HOUSING SIDE COVER |
| *5 | FUEL DELIVERY GUARD | *6 | STEERING GEAR HEAT INSULATOR |
.png) | N*m (kgf*cm, ft.*lbf): Specified torque | - | - |
ILLUSTRATION
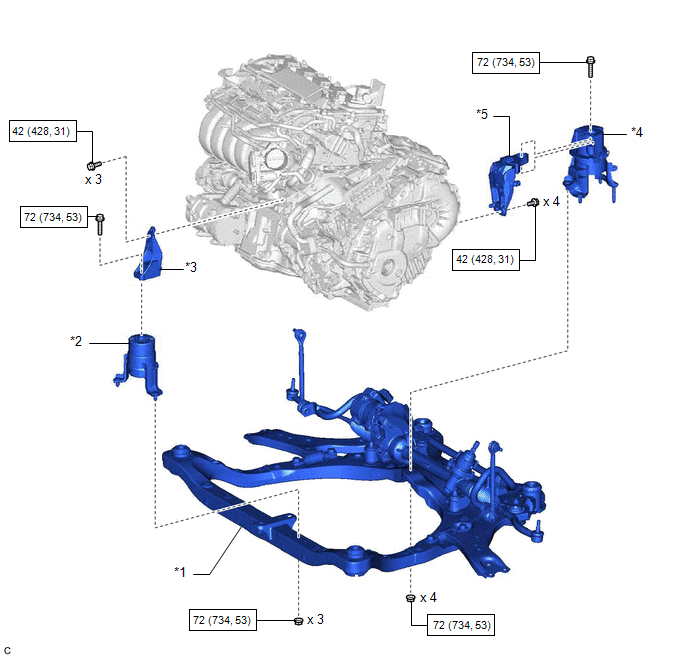
| *1 | FRONT FRAME ASSEMBLY | *2 | FRONT ENGINE MOUNTING INSULATOR |
| *3 | FRONT ENGINE MOUNTING BRACKET | *4 | REAR ENGINE MOUNTING INSULATOR |
| *5 | REAR ENGINE MOUNTING BRACKET | - | - |
| | N*m (kgf*cm, ft.*lbf): Specified torque | - | - |
ILLUSTRATION
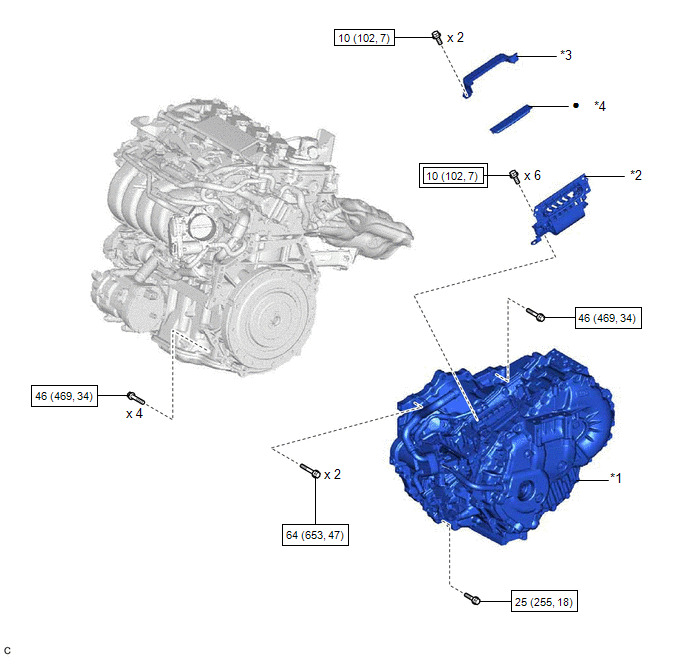
| *1 | HYBRID VEHICLE TRANSAXLE ASSEMBLY | *2 | MOTOR CABLE |
| *3 | CONNECTOR COVER | *4 | TERMINAL CAP |
.png) | Tightening torque for "Major areas involving basic vehicle performance such as moving/turning/stopping": N*m (kgf*cm, ft.*lbf) | | N*m (kgf*cm, ft.*lbf): Specified torque |
| ● | Non-reusable part | - | - |
ILLUSTRATION
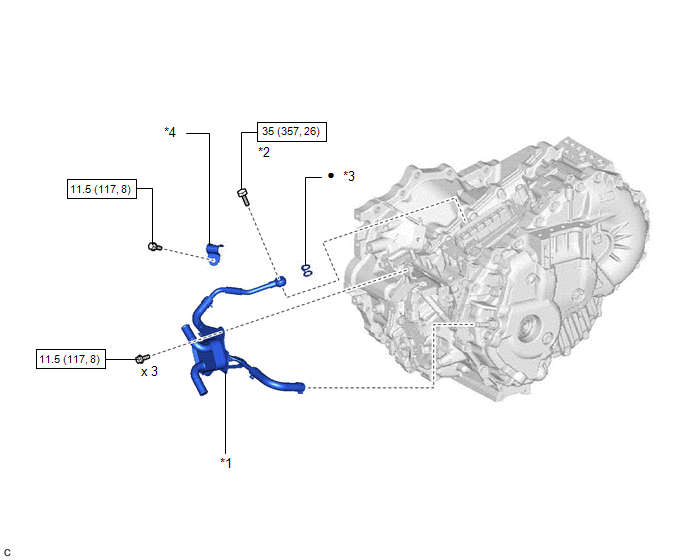
| *1 | MOTOR COOLING COOLER | *2 | OIL COOLER UNION BOLT |
| *3 | GASKET | *4 | NO. 1 OIL COOLER TUBE CLAMP |
| | N*m (kgf*cm, ft.*lbf): Specified torque | ● | Non-reusable part |
ILLUSTRATION
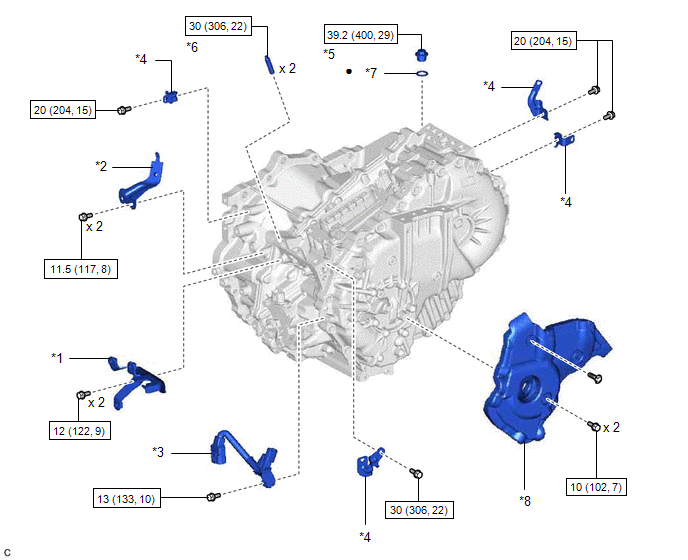
| *1 | NO. 1 TRANSMISSION CONTROL CABLE BRACKET | *2 | HOSE BRACKET |
| *3 | TRANSMISSION WIRE | *4 | WIRE HARNESS CLAMP BRACKET |
| *5 | TRANSAXLE HOUSING PLUG | *6 | STUD BOLT |
| *7 | GASKET | *8 | AUTOMATIC TRANSMISSION CASE COVER |
| | N*m (kgf*cm, ft.*lbf): Specified torque | ● | Non-reusable part |
READ NEXT:
 Installation
INSTALLATION CAUTION / NOTICE / HINT CAUTION: The engine assembly with hybrid vehicle transaxle assembly is very heavy. Be sure to follow the procedure described in the repair manual, or the engine li
Removal
REMOVAL CAUTION / NOTICE / HINT The necessary procedures (adjustment, calibration, initialization, or registration) that must be performed after parts are removed and installed, or replaced during hyb
SEE MORE:
Rear Window Defogger System does not Operate
DESCRIPTION When the rear window defogger switch on the air conditioning control assembly is pressed, the operation signal is transmitted to the air conditioning amplifier assembly via LIN communication. When the air conditioning amplifier assembly receives the signal, it turns on the DEF relay to o
Recovery Inspection
CAUTION / NOTICE / HINT CAUTION:
When disposing of an HV supply stack sub-assembly, make sure to return it through an authorized collection agent who is capable of handling it safely. If it is returned via the manufacturer specified route, it will be returned properly and in a safe manner by an a
