Lexus ES: CD Sound Skips
CAUTION / NOTICE / HINT
NOTICE:
-
Depending on the parts that are replaced during vehicle inspection or maintenance, performing initialization, registration or calibration may be needed. Refer to Precaution for Audio and Visual System.
Click here
.gif)
-
When replacing the radio receiver assembly, always replace it with a new one. If a radio receiver assembly which was installed to another vehicle is used, the following may occur:
- A communication malfunction DTC may be stored.
- The radio receiver assembly may not operate normally.
PROCEDURE
| 1. | CHECK CD |
| (a) Check that the CD is not deformed or cracked. OK: CD is not cracked or deformed. |
|
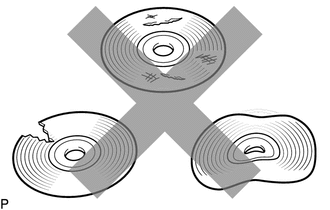
| NG | .gif) | END (CD IS FAULTY) |
|
.gif)
| 2. | CHECK CD |
| (a) Check the CD. OK: The CD is clean. NOTICE: Do not use a conventional record cleaner or anti-static preservative. HINT: If dirt is on the CD surface, wipe it clean with a soft cloth from the inside to the outside in a radial direction. |
|
.png)
| NG | | CLEAN CD |
|
| 3. | REPLACE CD AND RECHECK |
(a) Replace the CD with a new or known good one and check that the malfunction disappears.
OK:
Malfunction disappears.
| OK | | END (CD WAS FAULTY) |
|
| 4. | CHECK RADIO RECEIVER ASSEMBLY |
(a) Check the radio receiver assembly installation condition.
(1) Check that the radio receiver assembly is properly installed.
OK:
The radio receiver assembly is properly installed.
| OK | | REPLACE RADIO RECEIVER ASSEMBLY |
| NG | | REINSTALL RADIO RECEIVER ASSEMBLY |
READ NEXT:
 Cellular Phone Inspection
PROCEDURE 1. CHECK USAGE CONDITION (a) Check that the vehicle and cellular phone meet the following conditions: NOTICE: If changing cellular phone settings, updating software, etc. is necessa
Cellular Phone Registration Failure
CAUTION / NOTICE / HINT NOTICE:
Depending on the parts that are replaced during vehicle inspection or maintenance, performing initialization, registration or calibration may be needed. Refer to Pre
Customize Parameters
CUSTOMIZE PARAMETERS CUSTOMIZING WITH REMOTE TOUCH (a) Customizing with the touch function cancellation function. (w/ Touch Function Cancellation Function) NOTICE: Confirm the touchpad surface is free
SEE MORE:
Reassembly
REASSEMBLY PROCEDURE 1. INSTALL OIL PUMP ROTOR SET (a) Coat the drive rotor and driven rotor with engine oil and place them into the timing chain cover assembly with the rotor marks facing up. Check that the rotors rotate smoothly. *a Rotor Mark 2. INSTALL OIL PUMP COVER
Initialization
INITIALIZATION RESET BACK-UP BATTERY CONDITION HINT: If the back-up battery (mobilephone battery) has been replaced, it is necessary to perform the Reset Backup Battery Condition procedure. (a) Connect the Techstream to the DLC3. (b) Turn the power switch on (IG). (c) Turn the Techstream on. (d) Cho
