Lexus ES: Active Noise Control Ecu
Components
COMPONENTS
ILLUSTRATION
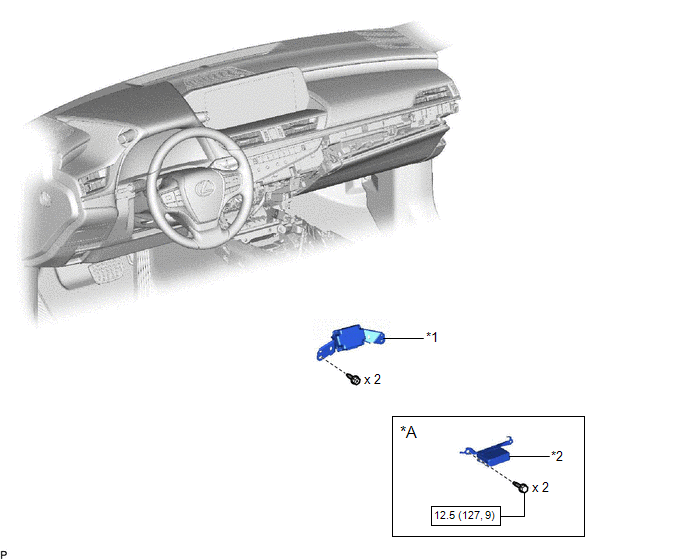
| *A | for HV Model | - | - |
| *1 | STEREO COMPONENT EQUALIZER ASSEMBLY | *2 | VEHICLE APPROACHING SPEAKER CONTROLLER |
 | N*m (kgf*cm, ft.*lbf): Specified torque | - | - |
Installation
INSTALLATION
PROCEDURE
1. INSTALL STEREO COMPONENT EQUALIZER ASSEMBLY
(a) Engage the 2 guides and install the stereo component equalizer assembly with the 2 screws.
(b) Engage the clamp.
(c) Connect the connector.
2. INSTALL VEHICLE APPROACHING SPEAKER CONTROLLER (for HV Model)
Click here 
3. INSTALL RADIO RECEIVER ASSEMBLY WITH SWITCH
Click here
Removal
REMOVAL
PROCEDURE
1. REMOVE RADIO RECEIVER ASSEMBLY WITH SWITCH
Click here .gif)
2. REMOVE VEHICLE APPROACHING SPEAKER CONTROLLER (for HV Model)
Click here
3. REMOVE STEREO COMPONENT EQUALIZER ASSEMBLY
| (a) Disconnect the connector. |
|
(b) Disengage the clamp.
| (c) Remove the 2 screws and disengage the 2 guides to remove the stereo component equalizer assembly. |
|

READ NEXT:
 Components
COMPONENTS ILLUSTRATION *A for Front Side *B for Rear Side *1 ACTIVE NOISE CONTROL MICROPHONE - -
Installation
INSTALLATION PROCEDURE 1. INSTALL ACTIVE NOISE CONTROL MICROPHONE (for Front Side) HINT:
Use the same procedure for the RH side and LH side.
The following procedure is for the LH side.
(a) Con
SEE MORE:
Mechanical System Tests
MECHANICAL SYSTEM TESTS STALL SPEED TEST CAUTION:
Do not perform a stall test if there are any people or objects near the vehicle.
The vehicle could begin moving suddenly, resulting in a serious accident.
Do not perform a stall test if any wheel chocks are out of position.
The vehicle
Invalid Data Received from ECM/PCM "A" Invalid Serial Data Received (U040181)
DESCRIPTION If the ECM cannot recognize the forward recognition camera. DTC U040181 is stored. DTC No. Detection Item DTC Detection Condition Trouble Area MIL DTC Output from U040181 Invalid Data Received from ECM/PCM "A" Invalid Serial Data Received Approximately 17 seconds or
