Lexus ES: Removal
REMOVAL
PROCEDURE
1. REMOVE FRONT DOOR SCUFF PLATE LH
Click here .gif)
2. REMOVE COWL SIDE TRIM BOARD LH
Click here .gif)
3. REMOVE FRONT DOOR OPENING TRIM COVER LH
Click here .gif)
4. REMOVE INSTRUMENT SIDE PANEL LH
Click here .gif)
5. REMOVE NO. 1 INSTRUMENT PANEL UNDER COVER SUB-ASSEMBLY
Click here .gif)
6. REMOVE LOWER INSTRUMENT PANEL FINISH PANEL SUB-ASSEMBLY
Click here .gif)
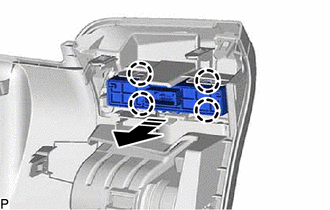
7. REMOVE PANORAMIC VIEW MONITOR SWITCH (NO. 2 COMBINATION SWITCH ASSEMBLY)
(a) Disengage the 4 claws and remove the panoramic view monitor switch (No. 2 combination switch assembly) as shown in the illustration.

.png) | Remove in this Direction |
READ NEXT:
 "CHK" message(s) are displayed on the SIGNAL CHECK screen.
DESCRIPTION On the SIGNAL CHECK screen, it is possible to check if the signals sent to the parking assist ECU are normal. Click here HINT:
On the SIGNAL CHECK screen, "OK" (blue) is displayed for
 BSM Buzzer Sound Request Signal Malfunction (C2A5C)
DESCRIPTION This DTC is stored when the rear television camera assembly receives an invalid communication signal from the blind spot monitor sensor RH. DTC No. Detection Item DTC Detection Cond
SEE MORE:
 Dtc Check / Clear
DTC CHECK / CLEAR CHECK DTC AND FREEZE FRAME DATA (USING TECHSTREAM) (a) Turn the power switch off. (b) Connect the Techstream to the DLC3. (c) Turn the power switch on (IG). (d) Turn the Techstream on. (e) Enter the following menus: Chassis / Electric Parking Brake / Trouble Codes. Chassis > Ele
 Torque Sensor Zero Point Adjustment Undone (C1515)
DESCRIPTION This DTC does not indicate a malfunction. The power steering ECU (rack and pinion power steering gear assembly) stores this DTC when it determines that torque sensor zero point calibration has not been performed. When the IG terminal voltage is below 8 V, torque sensor zero point calibra
© 2016-2026 Copyright www.lexguide.net

