Lexus ES: Removal
REMOVAL
CAUTION / NOTICE / HINT
NOTICE:
This procedure includes the removal of small-head bolts. Refer to Small-Head Bolts of Basic Repair Hint to identify the small-head bolts.
Click here .gif)
PROCEDURE
1. REMOVE FRONT FENDER APRON SEAL RH
Click here
2. REMOVE OIL PRESSURE CONTROL VALVE ASSEMBLY
| (a) Disconnect the oil pressure control valve assembly connector. |
|
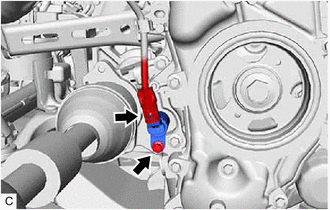
(b) Using an 8 mm socket wrench, remove the bolt and oil pressure control valve assembly from the timing chain cover assembly.
READ NEXT:
 Inspection
INSPECTION PROCEDURE 1. INSPECT OIL PRESSURE CONTROL VALVE ASSEMBLY (a) Measure the resistance according to the value(s) in the table below. Standard Resistance: Tester Connection Condition
Installation
INSTALLATION CAUTION / NOTICE / HINT NOTICE: This procedure includes the installation of small-head bolts. Refer to Small-Head Bolts of Basic Repair Hint to identify the small-head bolts. Click here
SEE MORE:
If you have a flat tire
Your vehicle is equipped with a
spare tire. The flat tire can be
replaced with the spare tire.
WARNING
■If you have a flat tire
Do not continue driving with a flat tire.
Driving even a short distance with a flat
tire can damage the tire and the wheel
beyond repair, which could result in
Installation
INSTALLATION PROCEDURE 1. PRECAUTION NOTICE: After turning the engine switch (for Gasoline Model) or power switch (for HV Model) off, waiting time may be required before disconnecting the cable from the negative (-) auxiliary battery terminal. Therefore, make sure to read the disconnecting the cable
© 2016-2026 Copyright www.lexguide.net
