Lexus ES: Installation
INSTALLATION
PROCEDURE
1. INSTALL REAR STABILIZER BUSHING
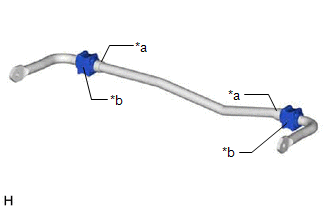
| (a) Install the 2 rear stabilizer bushings to the outside of the stoppers on the rear stabilizer bar. NOTICE: Be sure to install the rear stabilizer bushings so that each cutout faces the front of the vehicle. HINT: The cutout of the rear stabilizer bushing can be positioned either up or down. |
|
2. INSTALL REAR NO. 1 STABILIZER BAR BRACKET
(a) Install the 2 rear No. 1 stabilizer bar brackets to the 2 rear stabilizer bushings.
NOTICE:
- Ensure that the identification mark faces the right side of the vehicle.
- Be sure to install the rear No. 1 stabilizer bar brackets so that each arrow mark faces the upper side of the vehicle.
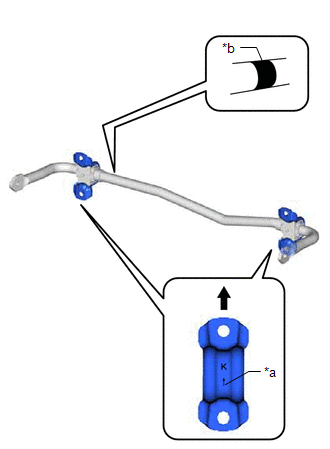
| *a | Arrow Mark |
| *b | Identification Mark |
.png) | Upper Side of the Vehicle |
3. INSTALL REAR LOWER STABILIZER BRACKET
| (a) Install the 2 rear lower stabilizer brackets to the rear stabilizer bushing. |
|
.png)
4. INSTALL REAR STABILIZER BAR
| (a) Install the rear stabilizer bar, 2 rear No. 1 stabilizer bar brackets, 2 rear stabilizer bushings and 2 rear lower stabilizer brackets to the rear suspension member sub-assembly with the 4 bolts. Torque: 78 N·m {795 kgf·cm, 58 ft·lbf} NOTICE:
|
|

5. STABILIZE SUSPENSION
Click here .gif)
6. INSTALL REAR STABILIZER LINK ASSEMBLY LH
| (a) Using a ball joint lock nut wrench, install the rear stabilizer link assembly LH with the nut (A). Torque: 95 N·m {969 kgf·cm, 70 ft·lbf} HINT:
|
|
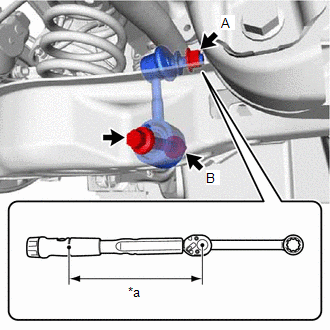
(b) Install the rear stabilizer link assembly LH with the bolt and nut (B).
Torque:
81 N·m {826 kgf·cm, 60 ft·lbf}
NOTICE:
- Because the nut (B) has its own stopper, do not turn the nut (B). Tighten the bolt with the nut (B) secured.
- Insert the bolt with the threaded end facing the front of the vehicle.
(c) Install the cap to the rear stabilizer link assembly LH.
7. INSTALL REAR STABILIZER LINK ASSEMBLY RH
HINT:
Perform the same procedure as for the LH side.
8. INSTALL CENTER EXHAUST PIPE ASSEMBLY
Click here
9. INSTALL REAR WHEEL
Click here
10. INSPECT FOR EXHAUST GAS LEAK
Click here
READ NEXT:
 Components
COMPONENTS ILLUSTRATION *A for Gasoline Model - - *1 NO. 1 FLOOR UNDER COVER *2 NO. 2 FLOOR UNDER COVER N*m (kgf*cm, ft.*lbf): Specified torque - - ILLUSTRATION *
Removal
REMOVAL CAUTION / NOTICE / HINT The necessary procedures (adjustment, calibration, initialization, or registration) that must be performed after parts are removed and installed, or replaced during rea
SEE MORE:
Brake System Control Module "A" System Internal Failure (C059704)
DESCRIPTION The skid control ECU (brake actuator assembly) stores this DTC if malfunctions are found in a circuit inside the ECU by self diagnosis. DTC No. Detection Item DTC Detection Condition Trouble Area C059704 Brake System Control Module "A" System Internal Failure Internal fa
Power Trunk Lid does not Operate Using Outside Switch
DESCRIPTION The door control switch signal is sent to the luggage closer motor assembly. If the power trunk lid does not operate using the door control switch, a door control switch circuit malfunction is a possible cause. WIRING DIAGRAM CAUTION / NOTICE / HINT NOTICE: If the luggage closer motor a
