Lexus ES: Installation
INSTALLATION
PROCEDURE
1. INSTALL AIR FUEL RATIO SENSOR
HINT:
Perform "Inspection After Repair" after replacing the air fuel ratio sensor.
Click here .gif)
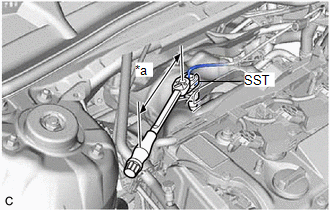
| (a) Using SST, install the air fuel ratio sensor to the exhaust manifold (TWC: Front Catalyst). SST: 09224-00012 Torque: Specified tightening torque : 44 N·m {449 kgf·cm, 32 ft·lbf} NOTICE: If the air fuel ratio sensor has been struck or dropped, replace it. HINT:
|
|
| (b) Connect the air fuel ratio sensor connector. |
|
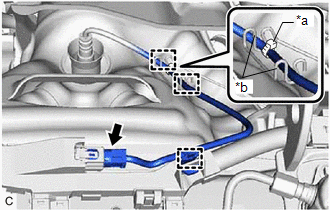
(c) Engage the 3 wire harness clamps so that the tie band is positioned as shown in the illustration.
2. INSTALL NO. 1 ENGINE COVER SUB-ASSEMBLY
Click here
3. INSPECT FOR EXHAUST GAS LEAK
Click here
4. PERFORM INITIALIZATION
(a) Perform "Inspection After Repair" after replacing the air fuel ratio sensor.
Click here
READ NEXT:
 Components
COMPONENTS ILLUSTRATION *1 AIR FUEL RATIO SENSOR - - N*m (kgf*cm, ft.*lbf): Specified torque * For use with SST
Removal
REMOVAL CAUTION / NOTICE / HINT The necessary procedures (adjustment, calibration, initialization or registration) that must be performed after parts are removed and installed, or replaced during air
SEE MORE:
Disc cannot be Inserted or is Ejected Right After Insertion
CAUTION / NOTICE / HINT NOTICE:
Depending on the parts that are replaced during vehicle inspection or maintenance, performing initialization, registration or calibration may be needed. Refer to Precaution for Navigation System.
Click here
When replacing the radio receiver assembly, always re
Disassembly
DISASSEMBLY CAUTION / NOTICE / HINT The necessary procedures (adjustment, calibration, initialization, or registration) that must be performed after parts are removed and installed, or replaced during cylinder head removal/installation are shown below. Necessary Procedure After Parts Removed/Install
