
Lexus ES: Inspection
INSPECTION
PROCEDURE
1. INSPECT MASS AIR FLOW METER SUB-ASSEMBLY
| (a) Perform a visual check for any foreign matter on the intake air temperature sensor (thermistor) of the mass air flow meter sub-assembly shown in the illustration. OK: There is no foreign matter. If the result is not as specified, clean the intake air temperature sensor (thermistor). |
|
.png)
(b) Clean the intake air temperature sensor (thermistor).
NOTICE:
- Do not contact the mass air flow meter sub-assembly with the nozzle of the air blow gun.
- Do not insert the nozzle of the air blow gun into the intake air temperature sensor (thermistor) area.
.png)
| *a | Air Blow Gun |
| *b | 10 mm (0.394 in.) |
| *c | Intake Air Temperature Sensor (Thermistor) |
| (1) Using an air blow gun, clean the intake air temperature sensor (thermistor) area of the mass air flow meter sub-assembly by applying approximately 10 intermittent bursts of air to the intake air temperature sensor (thermistor) area at a pressure of approximately 392 to 981 kPa (4.0 to 10.0 kgf/cm2, 57 to 142 psi). HINT: After performing cleaning, read the value of Data List item "Mass Air Flow Sensor" using the Techstream and if the value is not as specified, replace the mass air flow meter sub-assembly. |
|
.png)
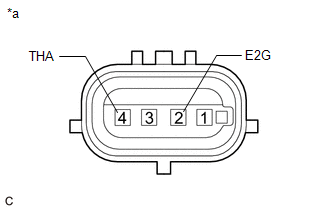
| (c) Check the intake air temperature sensor (thermistor) resistance. (1) Measure the resistance according to the value(s) in the table below. Standard Resistance:
If the result is not as specified, replace the mass air flow meter sub-assembly. |
|
READ NEXT:
 Installation
INSTALLATION PROCEDURE 1. INSTALL MASS AIR FLOW METER SUB-ASSEMBLY HINT: Perform "Inspection After Repair" after replacing the mass air flow meter sub-assembly. Click here (a) Install the mass air f
Relay
On-vehicle InspectionON-VEHICLE INSPECTION PROCEDURE 1. INSPECT MAIN RELAY (EFI-MAIN NO. 1) (a) Measure the resistance according to the value(s) in the table below. Standard Resistance: Tester
SEE MORE:
Hybrid/EV Battery Sensor Module (P0AFC00,P0AFC16,P0AFC96,P308A12)
DESCRIPTION If the battery voltage sensor detects an internal malfunction, it sends an error signal to the hybrid vehicle control ECU. When the hybrid vehicle control ECU receives the error signal from the battery voltage sensor, the ECU warns the driver and performs fail-safe control. DTC No.
Disassembly
DISASSEMBLY PROCEDURE 1. REMOVE END COVER (a) To prevent the coupling of the vacuum pump assembly from contacting the workbench, support the vacuum pump assembly with wooden blocks or an equivalent object. *a Wooden Block (b) Using a T30 "TORX" socket wrench, remove the 5
