Lexus ES: Disc cannot be Inserted or is Ejected Right After Insertion
CAUTION / NOTICE / HINT
NOTICE:
-
Depending on the parts that are replaced during vehicle inspection or maintenance, performing initialization, registration or calibration may be needed. Refer to Precaution for Navigation System.
Click here
.gif)
-
When replacing the radio receiver assembly, always replace it with a new one. If a radio receiver assembly which was installed to another vehicle is used, the following may occur:
- A communication malfunction DTC may be stored.
- The radio receiver assembly may not operate normally.
PROCEDURE
| 1. | CHECK IF A PROPER DISC IS INSERTED |
(a) Make sure that the disc is an audio disc or a disc with an MP3, WMA or AAC file, and that it is not deformed, flawed, stained, deteriorated or otherwise defective.
OK:
Normal disc.
HINT:
- Translucent or uniquely-shaped CDs cannot be played.
- CDs and DVDs with adhesive paper labels should not be played.
- Commercial audio CDs and DVDs can be played.
- CD-DA files on CD-ROMs, CD-Rs and CD-RWs can be played.
- MP3, WMA and AAC files on CD-ROMs, CD-Rs and CD-RWs can be played.
- For details on playable CDs and DVDs, refer to Owner's Manual.
| NG |  | CHANGE DISC |
|

| 2. | CHECK THAT DISC IS INSERTED PROPERLY |
(a) Check if the disc is inserted upside down.
OK:
Disc is properly inserted.
| NG | | INSERT DISC PROPERLY |
|
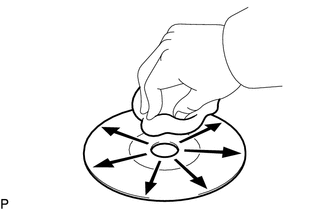
| 3. | CLEAN DISC AND RECHECK |
| (a) Clean the disc by wiping it clean with a soft cloth from the inside to the outside in a radial direction. OK: Malfunction disappears. NOTICE: Do not use a conventional record cleaner or anti-static preservative. |
|
| OK | | END (DISC WAS DIRTY) |
|
| 4. | REPLACE DISC AND RECHECK |
(a) Replace the disc with a new or known good one and check that the malfunction disappears.
OK:
Malfunction disappears.
| OK | | END (DISC WAS FAULTY) |
| NG | | REPLACE RADIO RECEIVER ASSEMBLY |
READ NEXT:
 Display does not Dim when Light Control Switch is Turned ON
DESCRIPTION When the navigation system is activated with the light control switch in the tail or head position, before AVC-LAN communication is established, the multi-display assembly dims the display
Does not Play even after Bluetooth Audio Mode is Selected
CAUTION / NOTICE / HINT NOTICE:
Depending on the parts that are replaced during vehicle inspection or maintenance, performing initialization, registration or calibration may be needed. Refer to Pre
Dtc Check / Clear
DTC CHECK / CLEAR CHECK DTC (CHECK USING TECHSTREAM) (a) Connect the Techstream to the DLC3. (b) Turn the power switch on (IG) and wait for 90 seconds. (c) Turn the Techstream on. (d) Enter the follow
SEE MORE:
On-vehicle Inspection
ON-VEHICLE INSPECTION CAUTION / NOTICE / HINT HINT: Refer to Problem Symptoms Table. Click here PROCEDURE 1. REMOVE FRONT WHEEL OPENING EXTENSION PAD RH Click here 2. REMOVE FRONT WHEEL OPENING EXTENSION PAD LH Click here 3. REMOVE NO. 1 ENGINE UNDER COVER Click here 4. REMOVE NO. 2 ENGIN
Components
COMPONENTS ILLUSTRATION *1 NO. 1 ENGINE UNDER COVER *2 FRONT FENDER APRON SEAL LH *3 FRONT FENDER APRON SEAL RH *4 FRONT WHEEL OPENING EXTENSION PAD LH *5 FRONT WHEEL OPENING EXTENSION PAD RH *6 NO. 2 ENGINE UNDER COVER ASSEMBLY N*m (kgf*cm, ft.*lbf): Specified t
