Lexus ES: Components
COMPONENTS
ILLUSTRATION
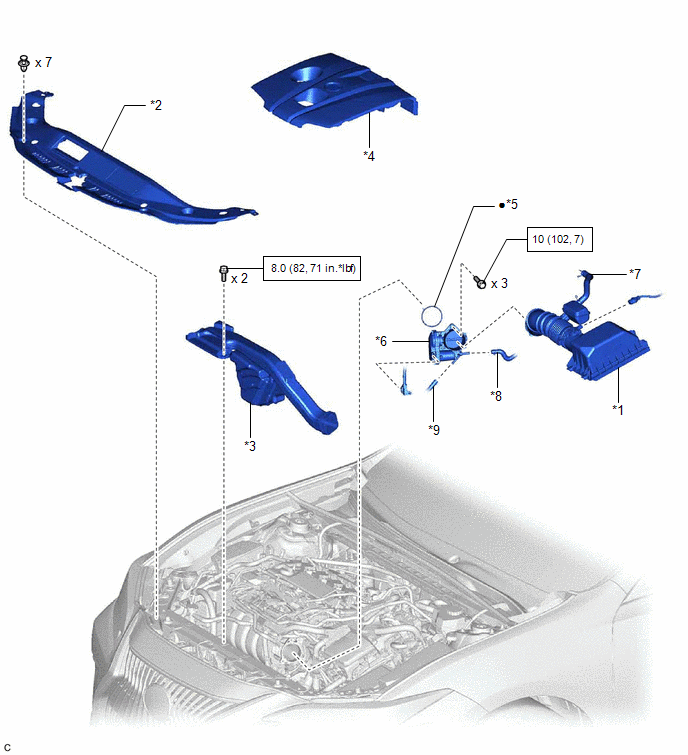
| *1 | AIR CLEANER CAP WITH AIR CLEANER HOSE | *2 | COOL AIR INTAKE DUCT SEAL |
| *3 | INLET AIR CLEANER ASSEMBLY | *4 | NO. 1 ENGINE COVER SUB-ASSEMBLY |
| *5 | THROTTLE BODY GASKET | *6 | THROTTLE BODY WITH MOTOR ASSEMBLY |
| *7 | NO. 2 VENTILATION HOSE | *8 | NO. 6 WATER BY-PASS HOSE |
| *9 | NO. 5 WATER BY-PASS HOSE | - | - |
.png) | N*m (kgf*cm, ft.*lbf): Specified torque | ● | Non-reusable part |
READ NEXT:
 On-vehicle Inspection
ON-VEHICLE INSPECTION PROCEDURE 1. INSPECT THROTTLE BODY WITH MOTOR ASSEMBLY (a) Before cleaning, or after cleaning the throttle body with motor assembly and installing it to the vehicle, turn the pow
Removal
REMOVAL CAUTION / NOTICE / HINT The necessary procedures (adjustment, calibration, initialization, or registration) that must be performed after parts are removed and installed, or replaced during thr
Inspection
INSPECTION PROCEDURE 1. INSPECT THROTTLE BODY WITH MOTOR ASSEMBLY (a) Measure the resistance according to the value(s) in the table below. Standard Resistance: Tester Connection Condition S
SEE MORE:
On-vehicle Inspection
ON-VEHICLE INSPECTION CAUTION / NOTICE / HINT CAUTION: To avoid the danger of being burned, do not remove the reserve tank cap while the coolant (for inverter) is still hot. Pressurized, hot coolant (for inverter) and steam may be released and cause serious burns. PROCEDURE 1. INSPECT FOR COOLANT L
Reassembly
REASSEMBLY CAUTION / NOTICE / HINT HINT:
Use the same procedure for the RH side and LH side.
The following procedure is for the LH side.
PROCEDURE 1. PRECAUTION NOTICE: After turning the engine switch (for Gasoline Model) or power switch (for HV Model) off, waiting time may be required befor
© 2016-2026 Copyright www.lexguide.net
