Lexus ES: 4wd Control Ecu
Components
COMPONENTS
ILLUSTRATION
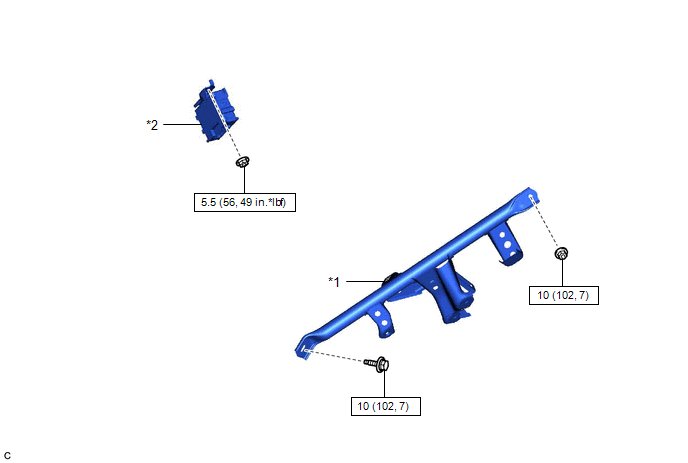
| *1 | NO. 3 INSTRUMENT PANEL TO COWL BRACE SUB-ASSEMBLY | *2 | 4WD ECU ASSEMBLY |
.png) | N*m (kgf*cm, ft.*lbf): Specified torque | - | - |
Installation
INSTALLATION
PROCEDURE
1. INSTALL 4WD ECU ASSEMBLY
(a) Install the 4WD ECU assembly to the instrument panel reinforcement assembly with the nut.
Torque:
5.5 N·m {56 kgf·cm, 49 in·lbf}
(b) Connect the 4WD ECU assembly connector.
2. INSTALL NO. 3 INSTRUMENT PANEL TO COWL BRACE SUB-ASSEMBLY
Click here .gif)
3. INSTALL LOWER NO. 1 INSTRUMENT PANEL AIRBAG ASSEMBLY
Click here
READ NEXT:
 AWD Warning does not Come ON
DESCRIPTION Refer to "4WD Warning Remains ON". Click here WIRING DIAGRAM Refer to "4WD Warning Remains ON". Click here CAUTION / NOTICE / HINT Refer to "4WD Warning Remains ON". Click here PROCE
AWD Warning Remains ON
DESCRIPTION The 4WD ECU assembly is connected to the combination meter assembly via CAN communication. If the 4WD ECU assembly stores any DTCs which are related to the dynamic torque control AWD syste
SEE MORE:
Diagnosis System
DIAGNOSIS SYSTEM DESCRIPTION (a) Sliding roof system data and Diagnostic Trouble Codes (DTCs) can be read through the vehicle Data Link Connector 3 (DLC3). When the system seems to be malfunctioning, use the Techstream to check for malfunctions and perform repairs. CHECK DLC3 (a) Check the DLC3. Cli
ECU Malfunction (B1003)
DESCRIPTION DTC No. Detection Item DTC Detection Condition Trouble Area Note B1003 ECU Malfunction A malfunction in the non-volatile storage of the central gateway ECU (network gateway ECU) is detected. Central gateway ECU (network gateway ECU) - PROCEDURE 1. RECONFIR
© 2016-2026 Copyright www.lexguide.net
