Lexus ES: Installation
Lexus ES (XZ10) Service Manual / Vehicle Interior / Door / Hatch / Fuel Lid Opener Switch / Installation
INSTALLATION
PROCEDURE
1. INSTALL FUEL LID OPENER SWITCH (TRUNK AND FUEL SWITCH ASSEMBLY)
(a) Engage the 2 claws to install the fuel lid opener switch (trunk and fuel switch assembly) as shown in the illustration.
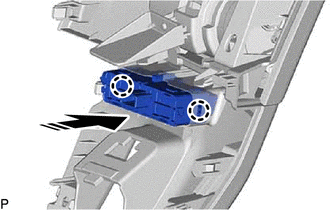
.png) | Install in this Direction |
2. INSTALL LOWER INSTRUMENT PANEL FINISH PANEL SUB-ASSEMBLY
Click here .gif)
3. INSTALL NO. 1 INSTRUMENT PANEL UNDER COVER SUB-ASSEMBLY
Click here
4. INSTALL INSTRUMENT SIDE PANEL LH
Click here
5. INSTALL FRONT DOOR OPENING TRIM COVER LH
Click here
6. INSTALL COWL SIDE TRIM BOARD LH
Click here
7. INSTALL FRONT DOOR SCUFF PLATE LH
Click here
READ NEXT:
 Precaution
PRECAUTION PRECAUTION FOR DISCONNECTING CABLE FROM NEGATIVE AUXILIARY BATTERY TERMINAL NOTICE: When disconnecting the cable from the negative (-) auxiliary battery terminal, initialize the following s
Parts Location
PARTS LOCATION ILLUSTRATION *1 FUEL LID LOCK WITH MOTOR ASSEMBLY *2 FUEL LID OPENER SWITCH *3 INSTRUMENT PANEL JUNCTION BLOCK ASSEMBLY - FUEL OPN RELAY *4 NO. 1 ENGINE ROOM RELAY B
SEE MORE:
Parts Location
PARTS LOCATION ILLUSTRATION *1 MILLIMETER WAVE RADAR SENSOR ASSEMBLY *2 FORWARD RECOGNITION CAMERA *3 BRAKE BOOSTER WITH MASTER CYLINDER ASSEMBLY - SKID CONTROL ECU *4 BRAKE ACTUATOR ASSEMBLY - PARKING BRAKE ECU ILLUSTRATION *1 STOP LIGHT SWITCH ASSEMBLY *2 SPIRAL CA
Cruise Control System Internal Failure (P057504,P057549)
DESCRIPTION When the hybrid vehicle control ECU detects an internal malfunction, DTC P057504 or P057549 is stored. DTC No. Detection Item DTC Detection Condition Trouble Area MIL DTC Output from P057504 Cruise Control System Internal Failure When the dynamic radar cruise control
© 2016-2026 Copyright www.lexguide.net
